Table of Contents
- Introduction
- Apache2 server
- Up and running Django (optional)
- Flask
- Update hosts
- Update 000-default.conf
- Additional
- URL path
- References
Introduction
Level: Intermediate
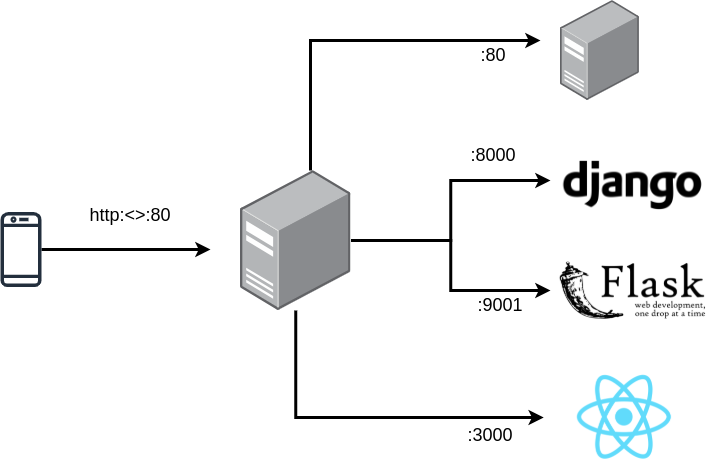
A reverse proxy server is a type of proxy server that typically sits behind the firewall in a private network and directs client requests to the appropriate backend server.
A reverse proxy ultimately forwards user/web browser requests to relevant web servers [1].
In this article, I will demonstrate how to create a reverse proxy using Apache2 on Linux.
1. Apache2 server
The Apache HTTP server is maintained by the Apache Software Foundation and it is widely-used web server. Let's set up Apache 2 server on Ubuntu.
If you're unsure how to install Ubuntu, check out my other article titled Install Ubuntu Desktop on VirtualBox for guidance.
$ sudo apt update
$ sudo apt upgrade -y
$ sudo apt install apache2
$ sudo systemctl start apache2
Explanation:
- First, update the Ubuntu's package index
- Then, upgrade all installed packages to their latest versions
sudo apt install apache2installs the Apache 2 web server package- Finally, start the Apache 2 web server.
Now, if you browse http://localhost, it should be working. By default, it redirects you to the default Apache2 page. Let's edit it.
Goto /var/www/html and edit index.html
<html>
    <head>
        <title>hello world</title>
    </head>
    <body>
        <h1>Hello World</h1>
    </body>
</html>
Now, refresh http://localhost/
2. Up and running Django (optional)
It's time to create a Django website. This is optional; you can work with your existing web project (but remember the port that your project uses).
$ mkdir django-proj && cd django-projWorking with venv (Python 3 virtual environment)
$ python3 -m venv envActivate a virtual environment (env)
$ source env/bin/activate Installing Django 4.0.3 and starting app django_project_2022
(env) $ pip3 install django
(env) $ django-admin startproject django_project_2022
(env) $ cd django_project_2022
The following command shall run the django_project_2022 project in port 8000. Make sure it stays open.
(env) .. django_project_2022$ python3 manage.py runserverOutput:
Django version 4.0.3, using settings 'django_project_2022.settings'
Starting development server at http://127.0.0.1:8000/
Quit the server with CONTROL-C.
Awesome! now let's move to the next step.
3. Flask
In this step you will start a flask project. First, let's setup:
$ mkdir flask-proj && cd flask-projWorking with venv
$ python3 -m venv env
$ source env/bin/activate
Installing flask
(env) $ pip3 install `flask 2.1.1`Edit app.py
(env) $ vi app.pyfrom flask import Flask
app = Flask(__name__)
@app.route("/")
def hello_world():
return "<p>Hello, World!</p>"Now, when you run the following command, it will start your flask project on port 9001
$ python3 -m flask run -p 9001Output:
* Debug mode: off
* Running on http://127.0.0.1:9001/
...
4. Update hosts
$ sudo vi /etc/hosts...
127.0.0.1 helloworld-django.priv
127.0.0.1 helloworld-flask.priv5. Update 000-default.conf
The 000-default.conf is a configuration file for the default virtual host in Apache 2 on Debian-based Linux distributions.
$ sudo vi /etc/apache2/sites-available/000-default.conf# django project
<VirtualHost *:80>
ServerName helloworld-django.priv
ProxyPass / http://127.0.0.1:8000/
ProxyPassReverse / http://127.0.0.1:8000/
</VirtualHost>
# flask project
<VirtualHost *:80>
ServerName helloworld-flask.priv
ProxyPass / http://127.0.0.1:9001/
ProxyPassReverse / http://127.0.0.1:9001/
</VirtualHost>Additionally, enable proxy and proxy_http modules in Apache 2:
$ sudo a2enmod proxy
$ sudo a2enmod proxy_http
Then, restart it
$ sudo systemctl restart apache2Now, try to access helloworld-django.priv. This should work, it should redirect you to your running Django project (port 8000).
And when you try to access hthelloworld-flask.priv. This should work, it should redirect you to your running Flask project (port 9001).
6. Additional
You can also use free DNS services like duckdns.org. You just have to update your ServerName. So, that it is accessible from anywhere.
URL path
What if you want to use URL path?
- For an example:
http://localhost/djangothat redirects to existing Django project - For an example:
http://localhost/flaskthat redirects to existing Flask project
This is how you will solve it:
$ sudo vi /etc/apache2/sites-available/000-default.conf<VirtualHost *:80>
ProxyPreservehost On
ServerName localhost
#ServerName hello-world.duckdns.org
ProxyPass /django http://127.0.0.1:8000/
ProxyPass /flask http://127.0.0.1:9001/
</VirtualHost>Finally, try accessing http://localhost/django OR http://localhost/flask it will redirect you to http://127.0.0.1:8000/ OR http://127.0.0.1:9001/ respectively.
Articles recommended by the author
- Connect a proxy server with Groovy script
- Getting started with ForgeRock Identity Gateway
- Learn Django over the weekend