As a holder of the ForgeRock Identity Gateway Product Knowledge Credly badge, I'll guide you through getting started with ForgeRock Identity Gateway. The ForgeRock Identity Gateway is a software solution designed to deliver secure access management for resources. It offer solutions such as OAuth 2.0, OpenID Connect, SAML, and UMA 2.0.
Contents
- Setting up ForgeRock Identity Gateway
- Setting up Apache Tomcat
- Setting up ForgeRock Access Management
- References
Prerequisites
- Proficient knowledge of Linux (Ubuntu 20.04)
- Familiarity with the use of vi as an editor
- Understanding of Reverse proxy concepts
- Essentials in ForgeRock Access Management Essentials
- Essentials in ForgeRock Identity Gateway Essentials
- Knowledge of Apache Tomcat
Chapter 1. Setting up ForgeRock Identity Gateway
I'm utilizing Ubuntu 22.04.3 Desktop in VirtualBox for this tutorial series. If you're interested in setting up Ubuntu Desktop, check out my other article -> "Install Ubuntu Desktop on VirtualBox". Alternatively, you can use your existing Ubuntu setup.
Now, let's set up ForgeRock IG.
First of all, create a directory:
$ mkdir ~/opt/forgerock/Download IG-2023.11.0.zip from ForgeRock backstage.
$ cd ~/opt/forgerock/
$ unzip ~/Downloads/IG-2023.11.0.zip
Create admin.json:
$ mkdir ~/.openig && mkdir ~/.openig/config/
$ cd ~/.openig/config/
$ vi ~/.openig/config/admin.json
And paste the following:
{
    "connectors": [
        {
            "port": 19080
        },
        {
            "port": 19081,
            "vertx": {
                "maxWebSocketFrameSize": 128000,
                "maxWebSocketMessageSize": 256000,
                "compressionLevel": 4
            }
        }
    ]
}
*IG will start on non-default ports, i.e., 19080 Vert.x-specific connection on port 19081.
1.1. Update /etc/hosts
Add the following line to the /etc/hosts:
127.0.0.1 ig.example.priv1.2. Starting IG
$ cd ~/opt/forgerock/identity-gateway/bin
$ ./start.sh
Output:
...
[main] INFO  o.f.openig.launcher.Launcher @system - All 16 verticles started in 1479ms on ports : [19080, 19081]
This means, your IG is up and running. Browse ig.example.priv:19080

1.3. Stopping IG
Let's stop the IG for now by pressing ctrl + c.
1.4. IG as a Linux Service (optional)
I utilize IG as a Linux service for ease of use. First, create identity-gateway.service:
$ sudo vi /etc/systemd/system/identity-gateway.servicePaste the following:
[Unit]
Description=ForgeRock Identity Gateway
After=network.target

[Service]
User=tux
ExecStart=/home/tux/opt/forgerock/identity-gateway/bin/start.sh
ExecStop=/home/tux/opt/forgerock/identity-gateway/bin/stop.sh

Restart=always
RestartSec=10

[Install]
WantedBy=multi-user.target
*change tux to your relevant user.
Reload the daemon and start the service:
$ sudo systemctl daemon-reload
$ sudo systemctl start identity-gateway
$ sudo systemctl enable identity-gateway
$ systemctl status identity-gateway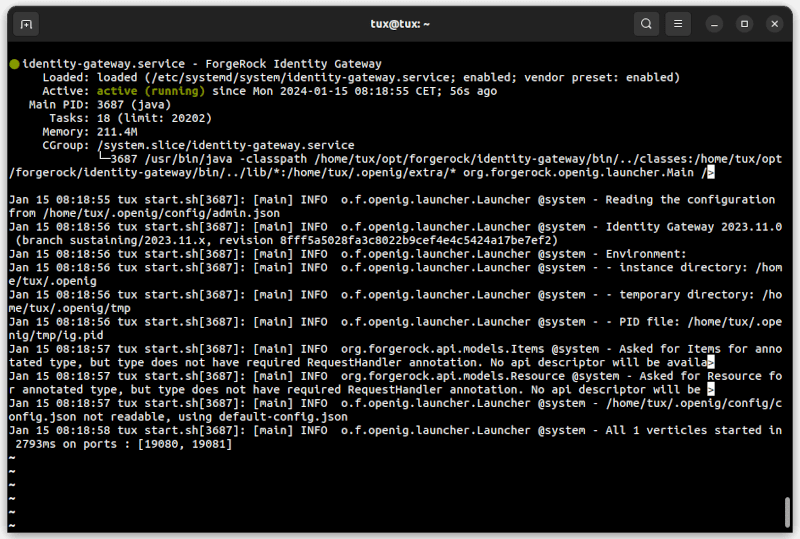
*If you wish to learn more about creating Linux service, refer to this article titled as "Create an App as a Linux Service".
Now, let's proceed to the next section: Setting up ForgeRock Access Management. ForgeRock AM operates as a web container, and one of the methods for running AM is through Apache Tomcat. Let's go ahead and set up Apache Tomcat.
Chapter 2. Apache Tomcat
Apache Tomcat is a popular open source web server and servlet container for Java code [1].
2.1. Setting up Tomcat
Make sure that you have JAVA installed on your machine:
$ java --version

#output
openjdk 11.0.21 2023-10-17
If not:
$ sudo apt install openjdk-11-jre-headlessAlso, make sure JAVA_HOME exists, if not:
$ export JAVA_HOME=/usr/lib/jvm/java-11-openjdk-amd64$ source ~/.bashrcLet's verify JAVA_HOME:
$ echo $JAVA_HOME
Change the permissions for cacerts:
$ sudo chmod 644 $JAVA_HOME/lib/security/cacertsOnce again update /etc/hosts:
$ sudo vi /etc/hosts

127.0.0.1    am.example.priv     #For AM purposes, use port 8080
...
Download Apache Tomcat 8.5.70 from https://tomcat.apache.org. Or, you can find this from my GitHub assets/tomcat/.
$ sudo apt update
$ mkdir ~/opt/tomcat
$ uzip apache-tomcat-8.5.70.zip ~/opt/tomcat
2.2. server.xml
Take a note of server.xml, Tomcat uses port 8080:
$ less ~/opt/tomcat/conf/server.xml ...
<Connector port="8080"
protocol="HTTP/1.1"
connectionTimeout="20000"
redirectPort="8443"
maxParameterCount="1000" />
...2.2. setenv.sh
Create setenv.sh:
$ vi ~/opt/tomcat/bin/setenv.shPaste the following code:
export JAVA_HOME=/usr/lib/jvm/java-11-openjdk-amd64
export CATALINA_OPTS="$CATALINA_OPTS -Xmx2g -XX:MaxMetaspaceSize=256m"
$ chmod -R +x ~/opt/tomcat/bin2.3. Starting the Tomcat
Nice, now let's start the Tomcat:
$ cd ~/opt/tomcat/bin
$ ./startup.sh

Using CATALINA_BASE:   /home/tux/opt/tomcat
Using CATALINA_HOME:   /home/tux/opt/tomcat
Using CATALINA_TMPDIR: /home/tux/opt/tomcat/temp
Using JRE_HOME:        /usr/lib/jvm/java-11-openjdk-amd64
Using CLASSPATH:       /home/tux/opt/tomcat/bin/bootstrap.jar:/home/tux/opt/tomcat/bin/tomcat-juli.jar
Using CATALINA_OPTS:    -Xmx2g -XX:MaxMetaspaceSize=256m
Tomcat started.
Now, navigate to http://am.example.priv:8080 in your browser; you should see something similar to the following:

2.3. Setting up ForgeRock Access Management
ForgeRock Access Management (AM) serves as a solution for enterprise access management needs. Let's set up ForgeRock AM. First, download AM-7.4.0.war from the ForgeRock backstage.
Rename AM-7.4.0.war to am:
Copy the .war file to ~/opt/tomcat/webapps:
$ cp ~/Downloads/am.war ~/opt/tomcat/webapps*The .war must be inside webapps folder!
2.4. Shutdown Tomcat
Now, shutdown and restart the Tomcat service:
$ cd ~/opt/tomcat/bin
$ ./shutdown.sh -force
$ ./startup.sh
After a few seconds of startup, go to http://am.example.priv:8080/am. You should be able to see the installation wizard as shown below:
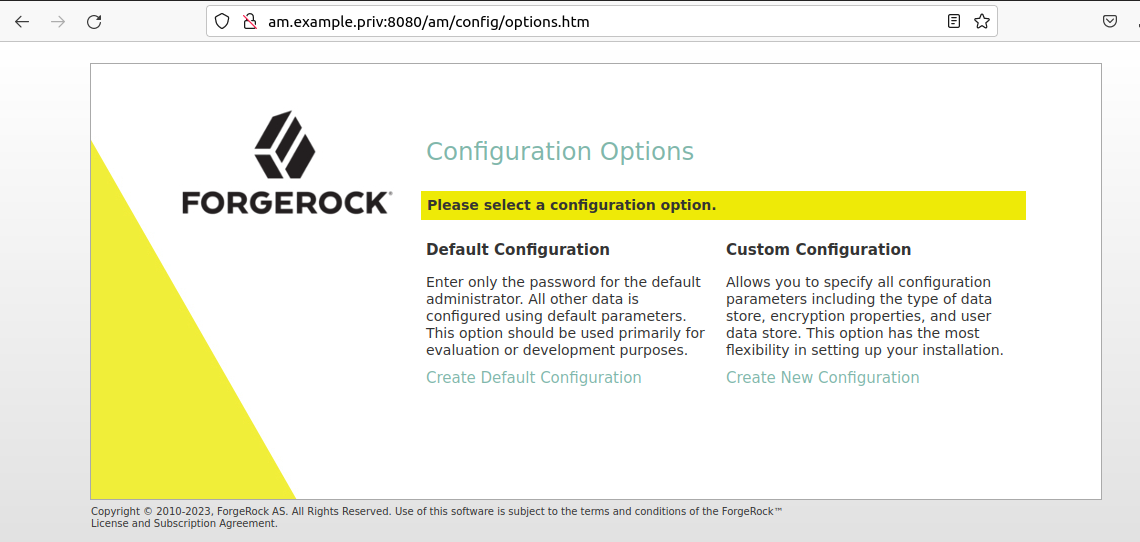
In the setup wizard,
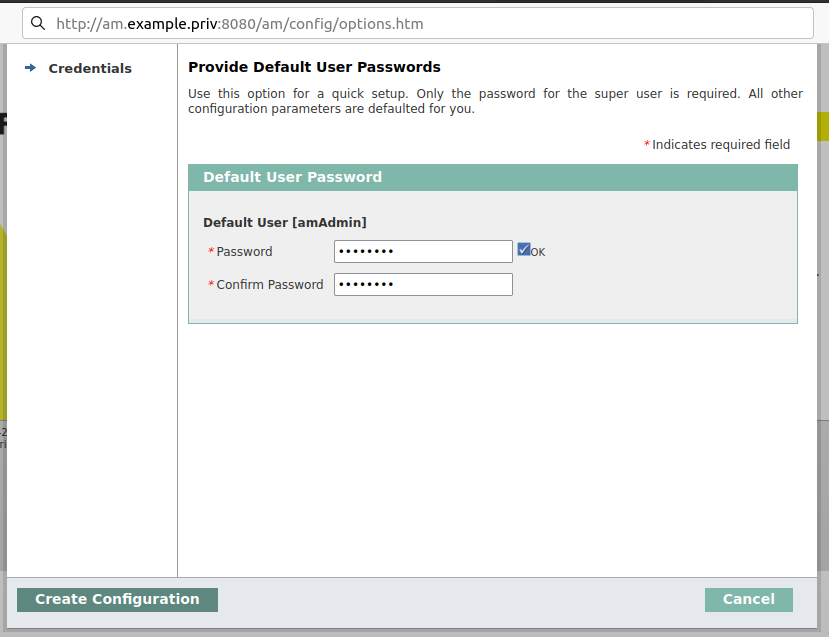
- Choose
Default configuration. - Provide
amAdminpasswordpassw0rd. - Click
Create configurationwhich make take sometime.
After the successful installation, click on proceed to login and provide your above-mentioned credential.
🎉 Great! You have successfully deployed ForgeRock AM 7.4.0 on Apache Tomcat 8.5.70.
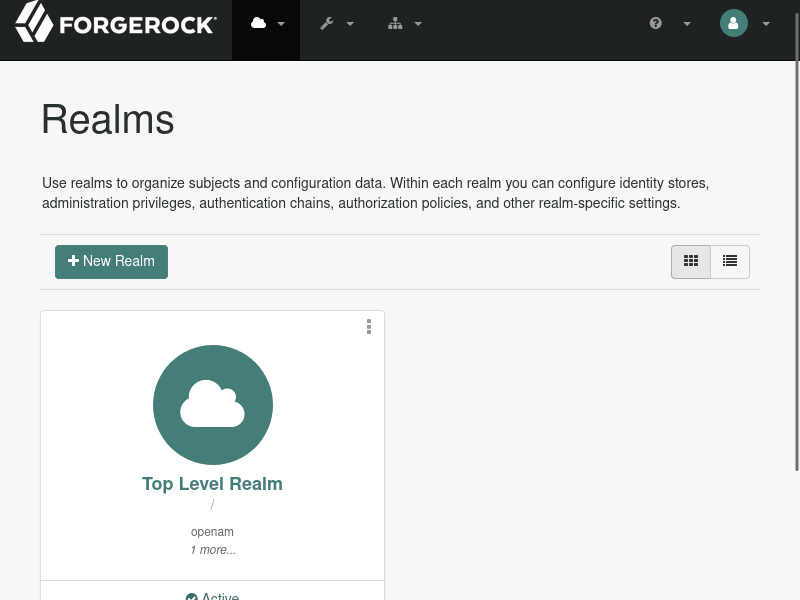
First glimpse of ForgeRock Access Management 7.4.0.
2.5. Create Tomcat as a Linux Service (optional)
Let's stop the Tomcat server for now:
$ ./shutdown.shCreate tomcat.service:
$ sudo vi /etc/systemd/system/tomcat.servicePaste the following:
[Unit]
Description=Apache Tomcat
After=network.target

[Service]
Type=forking
User=tux

Environment="JAVA_HOME=/usr/lib/jvm/java-11-openjdk-amd64"
Environment="JAVA_OPTS=-Djava.security.egd=file:///dev/urandom"
Environment="CATALINA_BASE=/home/tux/opt/tomcat"
Environment="CATALINA_HOME=/home/tux/opt/tomcat"
Environment="CATALINA_PID=/home/tux/opt/tomcat/temp/tomcat.pid"
Environment="CATALINA_OPTS=-Xmx2g -XX:MaxMetaspaceSize=256m"

ExecStart=/home/tux/opt/tomcat/bin/startup.sh
ExecStop=/home/tux/opt/tomcat/bin/shutdown.sh

Restart=always
RestartSec=10

[Install]
WantedBy=multi-user.target
*replace tux to your $USER.
Reload the daemon:
$ sudo systemctl daemon-reload$ sudo systemctl start tomcat
$ sudo systemctl enable tomcat
$ systemctl status tomcatOutput:

Also, the http://am.example.priv:8080 should be up and running.
To check the logs of the Tomcat, use the following command:
$ tail ~/opt/tomcat/logs/catalina.out
References
[1] P. Fol, “Java basics: What is apache tomcat?,” JRebel by Perforce, Mar. 17, 2022. https://www.jrebel.com/blog/what-is-apache-tomcat (accessed Jan. 12, 2024).
[2] https://www.digitalocean.com/community/tutorials/how-to-install-apache-tomcat-10-on-ubuntu-20-04