In this article, I will help you learn Django and guide you through creating a simple Django web project over the weekend. We will focus on building an easy and user-friendly password manager web application. We'll call this project easy-password-manager.
Table of contents
- Mockup
- What is Django, anyway?
- Project initialization
- Django app (continued)
- Authorization
- Testing
- Overall project structure
- Moving further
- Source code
- References
Level
- Beginner
Prerequisite
- Basic Linux command
- Basic Python3 knowledge
Mockup
The project design and layout includes:
What is Django?
Django is a powerful Python web framework designed for rapid web developement and clean, pragmatic design [1]. According to [2], Django stands out as the second best backend framework for web development. Flask is another popular framework that serves as an alternative to Django.
What is MVT in Django?
Django is built upon the MVT (Model-View-Template) architecture, which is a software design pattern used for web application development [3]. Figure 1 illustrates the MVT architecture for Django.
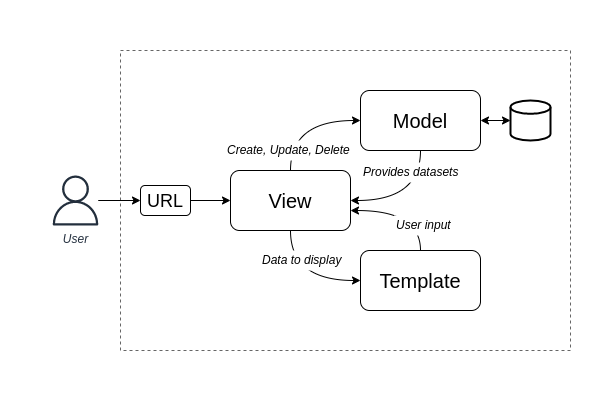
figure 1. Model-View-Template architecture for Django, own representation based on [4] and [5].
Next, I will quickly delve into these three "seperation of concerns"
1. Model
The model acts as the data interface, responsible for data migration and maintenance [6].
2. View
The view is where all application logic is written.
3. Template
The template is the front-end layer comprising visual components for the application [7].
Project Initialization
Before starting the project, make sure that Python3 is already installed on your machine
$ python3 --versionCreate directories
$ mkdir easy-password-manager
$ cd easy-password-manager
git
Make sure git is installed and easy-password-manager is initialized
$ git init .Create .gitignore file
$ touch .gitignore
$ vi .gitignore
Save the following list into .gitignore
venv
__pycache__
The file specifies intentionally untracked folders/files that Git should ignore [8]. Therefore, any files mentioned inside the .gitignore will be excluded.
venv
The python3 venv module helps create and manage "virtual environments" [9]. Now, let's setup venv:
$ python3 -m venv venvActivate venv
$ source venv/bin/activateDjango setup
Now, time to install Django
(venv) $ pip3 install django
(venv) $ pip3 freeze > requirements.txt
Create a new Django project called easy_password_manager
(venv) $ django-admin startproject easy_password_manager .startapp
Furthermore, create an app called passwordmanager. "Django uses the concept of projects and apps to keep code clean and readable" [10].
(venv) $ python3 manage.py startapp passwordmanagerWe have some untracked files, let's git commit
(venv) $ git status

Untracked files:
    .gitignore
    easy_password_manager/
    manage.py
    passwordmanager/
    requirements.txt
(venv) $ git add .
(venv) $ git commit -m "initial updates"Let's look into the current folder structure, and I'll explain what those each file is used for
.
├── easy_password_manager
│   ├── asgi.py
│   ├── __init__.py
│   ├── settings.py
│   ├── urls.py
│   └── wsgi.py
├── manage.py
├── passwordmanager
│   ├── admin.py
│   ├── apps.py
│   ├── __init__.py
│   ├── migrations
│   ├── models.py
│   ├── tests.py
│   └── views.py
└── venv
(1) asgi.py: Asynchronous Server Gateway Interface [11].
(2) settings.py: To store configuration for Django project [12].
(3) urls.py: Consist of urlpatterns list, which is responsible for routing URLs to relevant views [13].
(4) wsgi.py: "Web Server Gateway Interface (WSGI) is a mediator responsible for conveying communication between a web server and a Python web application" [14].
(5) manage.py: A command-line utility to interact with Django [15].
(6) passwordmanager (Django app)
- admin.py: To display models in the Django admin panel [16].
- apps.py: A configuration file common to all Django apps [17].
- migrations: Contains app's migrations related files.
- models.py: To define database for the app.
- tests.py: For testing the app.
- views.py: Contains Django views; which are Python functions that takes http requests and returns http response, like HTML documents [18].
Initial migration
"Migrations progate changes to models (adding a field, deleting a model, etc.) into the database schema" [19]. Let us do an initial migration
(venv) $ python3 manage.py makemigrations
(venv) $ python3 manage.py migrate
Output:
Operations to perform:
  Apply all migrations: admin, auth, contenttypes, sessions
Running migrations:
  Applying contenttypes.0001_initial... OK
  Applying auth.0001_initial... OK
  Applying admin.0001_initial... OK
  Applying admin.0002_logentry_remove_auto_add... OK
  Applying admin.0003_logentry_add_action_flag_choices... OK
  Applying contenttypes.0002_remove_content_type_name... OK
  Applying auth.0002_alter_permission_name_max_length... OK
  Applying auth.0003_alter_user_email_max_length... OK
  Applying auth.0004_alter_user_username_opts... OK
  Applying auth.0005_alter_user_last_login_null... OK
  Applying auth.0006_require_contenttypes_0002... OK
  Applying auth.0007_alter_validators_add_error_messages... OK
  Applying auth.0008_alter_user_username_max_length... OK
  Applying auth.0009_alter_user_last_name_max_length... OK
  Applying auth.0010_alter_group_name_max_length... OK
  Applying auth.0011_update_proxy_permissions... OK
  Applying auth.0012_alter_user_first_name_max_length... OK
  Applying sessions.0001_initial... OK
Note: As soon as you make initial migration, db.sqlite3 appears on your project folder. By DB sqlite3 will be used as Django database.
You can use tools like SQLite Viewer for VSCode or DB Browser for SQLite to work with the database.
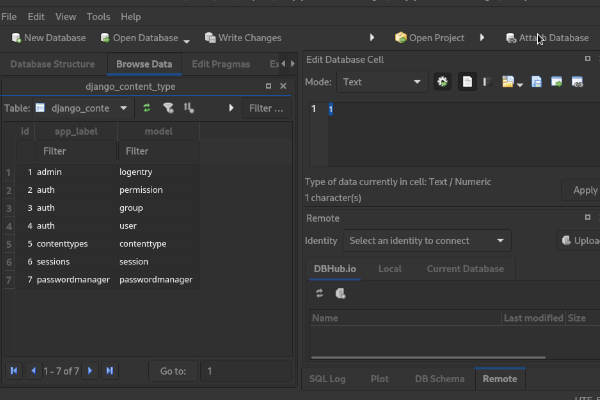
figure 2. DB Browser for SQLite.
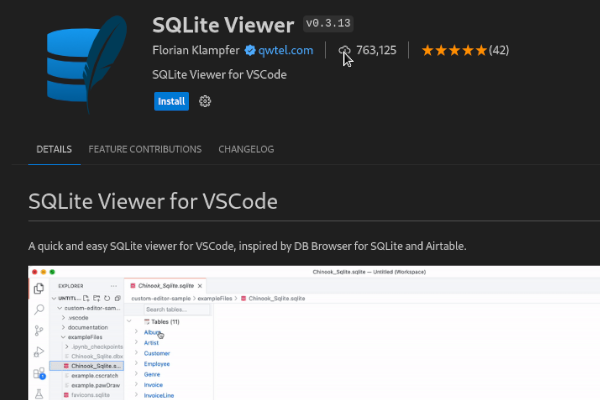
figure 3. VS Code extension called SQLite Viewer.
createsuperuser
Now, create an initial superuser account. A superuser is an account that has all permissions [20].
(venv) $ python3 manage.py createsuperuser

Username: amaharjan  #replace with your admin username
Email address: hello@amaharjan.de  #replace with your email
Password:
Password (again):
Superuser created successfully.
runserver
(venv) $ python3 manage.py runserverThis will start the development server for the project at port 8000 (default port).
Browse 127.0.0.1:8000
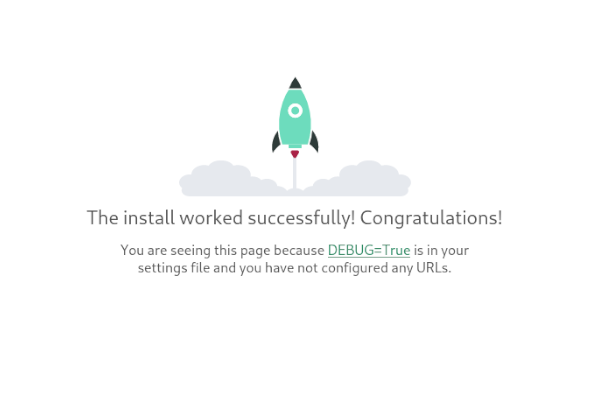
figure 4. Initial index page of the Django.
For admin page, go to 127.0.0.1:8000/admin
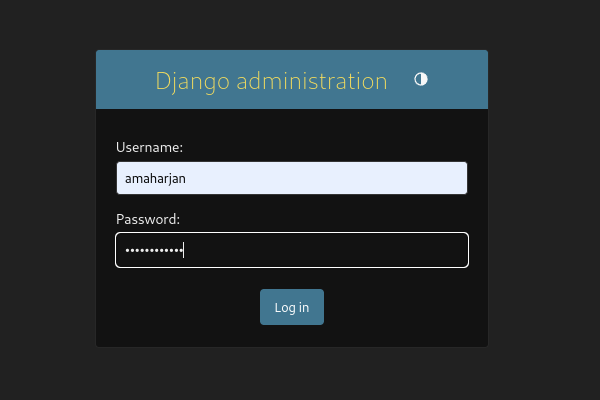
figure 5. Django admin login page.
Django app
Continuing from the "Django setup" section. This section will be focused on the Django app; let's recap the folder structure for passwordmanager app:
....
├── passwordmanager
│   ├── admin.py
│   ├── apps.py
│   ├── __init__.py
│   ├── migrations
│   ├── models.py
│   ├── tests.py
│   └── views.py
....
models
Create a database model for passwordmanager. Paste the following code:
#models.py

1  from django.db import models
2  from django.urls import reverse
3
4  class PasswordManager(models.Model):
5      name = models.CharField(max_length=200)
6      username = models.TextField()
7      password = models.TextField()
8      url = models.TextField()
9      datestamp = models.DateTimeField(auto_now_add=True)
10
11     def get_absolute_url(self):
12         return reverse('password_manager_list')
Here, a Django model named PasswordManager represents data structure for the passwordmanager app. The database table will be created once the migration process is completed (which we'll cover later).
In line 2 reverse function is used to generate URLs by reversing the URL patterns (will be defined later in urls.py).
In line 4, we defined a Django model named PasswordManager.
From line 5 to 9, we defined fields for the model.
And in line 11, we defined the method called get_absolute_url; often used for redirecting after successful form submissions.
views
#views.py

from django.views.generic import ListView, DetailView, CreateView
from django.views.generic.edit import UpdateView, DeleteView
from django.urls import reverse_lazy
from .models import PasswordManager

class PasswordManagerCreateView(CreateView):
    model = PasswordManager
    template_name = 'passwordmanager/password_add.html'
    fields = '__all__'

class PasswordManagerListView(ListView):
    model = PasswordManager
    template_name = 'passwordmanager/password_list.html'

class PasswordManagerUpdateView(UpdateView):
    model = PasswordManager
    template_name = 'passwordmanager/password_update.html'
    fields = '__all__'

class PasswordManagerDeleteView(DeleteView):
    model = PasswordManager
    template_name = 'passwordmanager/password_delete.html'
    success_url = reverse_lazy('password_manager_list')

class PasswordManagerDetailView(DetailView):
    model = PasswordManager
    template_name = 'passwordmanager/password_detail.html'
Django views in the django.views.generic module were utilized for performing CRUD operations, including:
- PasswordManagerCreateView:
- View for creating a new
PasswordManagerobject. - Response will be rendered by the
password_add.htmltemplate.
- View for creating a new
- PasswordManagerDetailView:
- Will render a "detail" view of the object.
- PasswordManagerListView:
- Will render list of
PasswordManagerobjects.
- Will render list of
- PasswordManagerUpdateView:
- View for updating the object.
- A response will be rendered by the
password_update.htmltemplate.
- PasswordManagerDeleteView:
- View for deleting the object retrieved with self.get_object() (i.e., PK or ID of the
PasswordManagerobject).
- View for deleting the object retrieved with self.get_object() (i.e., PK or ID of the
model = PasswordManager:- means, we will be using
PasswordManagermodel defined inmodels.py
- means, we will be using
- reverse_lazy('password_manager_list'):
- reverse_lazy is a utility in Django used to convert URL names into corresponding URL paths [21].
Working with Django templates
HTML/CSS template
For simplicity I'll be using Bootstrap v5.0.2 for this project.
I've already created the template, so just copy the theme folder from https://github.com/asis2016/easy-password-manager/tree/main/theme onto your easy-password-manager folder. The folder structure should look like this
.
└── easy-password-manager
    └── theme
        ├── bootstrap.min.css
        ├── create.html
        ├── delete.html
        ├── detail.html
        ├── index.html
        ├── login.html
        ├── style.css
        └── update.html
Django employs templates to serve HTML content through a view. By default, it searches for templates within each app [22].
Create the following directories
(venv) $ cd passwordmanager
(venv) $ mkdir templates && cd templates
(venv) $ mkdir passwordmanager
The template structure for the app will look like this
.
├── passwordmanager
    └── templates
        └── passwordmanager
                ├── base.html
                ├── password_add.html
                ├── password_delete.html
                ├── password_detail.html
                ├── password_list.html
                └── password_update.html
base.html
Create the base.html with the following code:
{% load static %} <!-- (1) -->
<!doctype html>
<html lang="en">

<head>
    <meta charset="utf-8">
    <meta name="viewport" content="width=device-width, initial-scale=1">
    <meta name="author" content="www.amaharjan.de">
    <title>Easy Password Manager</title>
    <!-- CSS -->
    <link href="{% static 'bootstrap.min.css' %}" rel="stylesheet">  <!-- (2) -->
    <link href="{% static 'style.css' %}" rel="stylesheet">  <!-- (3) -->

    <!-- Include Clipboard.js from CDN -->
    <script src="https://cdnjs.cloudflare.com/ajax/libs/clipboard.js/2.0.8/clipboard.min.js"></script>
</head>

<body>
    <nav class="container py-2 bg-light border-bottom">
        <div class=" d-flex flex-wrap">
            <ul class="nav me-auto">
                <li class="nav-item"><a href="#" class="nav-link link-dark px-2">Settings</a></li>
                <li class="nav-item"><a href="https://github.com/asis2016/easy-password-manager"
                        class="nav-link link-dark px-2">GitHub</a></li>
                <li class="nav-item"><a href="#" class="nav-link link-dark px-2">About</a></li>
            </ul>
            <!-- start logout link  -->
            <!-- ends logout link  -->
        </div>
    </nav>
    <header class="container py-3 mb-4 border-bottom">
        <div class="d-flex flex-wrap justify-content-center">
            <a href="{% url 'password_manager_list' %}"
                class="d-flex align-items-center mb-3 mb-lg-0 me-lg-auto text-dark text-decoration-none">
                <h5>Easy pass manager</h5>
            </a>
        </div>
    </header>
    <!-- body content -->
    <div class="container">
        {% block content %} <!-- (4) -->
        {% endblock content %}
    </div>

    {% block footer %} <!-- (5) -->
    {% endblock footer %}
</body>

</html>
base.html serves as a foundational template for other .html pages in the project. Let's break down the Jinja expressions used within this html:
(1) {% load static %}: This is used to include static files like CSS, JavaScript, images, etc.
(2) {% static 'bootstrap.min.css' %}: Dynamically generates the URL for the bootstrap.min.css location.
(3) {% static 'style.css' %}: Dynamically generates the URL for the style.css location.
(4) {% block content %} ... {% endblock content %}: These are block tags called content which will be overridden by the child template.
(5) {% block footer %} ... {% endblock footer %}: These are block tags called footer which will be overridden by the child template.
password_add.html
Create the password_add.html with the following code:
{% extends 'passwordmanager/base.html' %}   <!-- (1) -->

{% block content %}
<div class="row">
    <div class="col-md-6 offset-md-3">
        <form method="post">            <!-- (2) -->
            {% csrf_token %}            <!-- (3) -->
            <div class="card">
                <div class="card-header">
                    <h5>Add new credential</h5>
                </div>
                <div class="card-body">
                    <div class="mb-3">
                        <label for="id_name" class="form-label">Title</label>
                        <!-- (4) -->
                        <input type="text" class="form-control" id="id_name" name="name" maxlength="200" required="" autocomplete="off">
                    </div>
                    <div class="mb-3">
                        <label for="id_username" class="form-label">Username</label>
                        <input type="text" class="form-control" id="id_username" name="username" required="" autocomplete="off">
                    </div>
                    <div class="mb-3">
                        <label for="id_password" class="form-label">Password</label>
                        <input type="text" class="form-control" id="id_password" name="password" required="" autocomplete="off">
                    </div>
                    <div class="mb-3">
                        <label for="id_url" class="form-label">URL</label>
                        <input type="text" class="form-control" id="id_url" name="url" required="" autocomplete="off">
                    </div>
                </div>
                <div class="card-footer">
                    <div class="d-flex" style="justify-content: space-between; align-items: center;">
                        <button type="submit" class="btn btn-primary">Save</button>
                        <a href="{% url 'password_manager_list' %}">Go back</button> <!-- (4) -->
                    </div>
                </div>
            </div>
        </form>
    </div>
</div>
{% endblock content %}
password_add.html serves as the template for PasswordManagerCreateView (views.py). Let's break down the Jinja expressions used in password_add.html:
(1) {% extends 'passwordmanager/base.html' %}: This template extends from the base template.
(2) <form method="post">{% csrf_token %} ...: The form is the part of POST method which include Cross-Site Request Forgery (CSRF) token within.
(3) {% url 'password_manager_list' %}: Jinja tag to generate the URL for the PasswordManagerListView view.
password_delete.html
Create the password_delete.html with the following code:
{% extends 'passwordmanager/base.html' %}

{% block content %}
<div class="row">
    <div class="col-md-6 offset-md-3">
        <form method="post">
            {% csrf_token %}
            <div class="card">
                <div class="card-header">
                    <h4 class="text-danger">Are you sure?</h4>
                </div>
                <div class="card-body">
                    <p class="text-danger">You are about to delete</p>
                    <table class="table">
                        <tr>
                            <td>Title</td>
                            <td>{{ object.name }}</td>    <!-- (1) -->
                        </tr>
                        <tr>
                            <td>Username</td>
                            <td>{{ object.username }}</td>    <!-- (3) -->
                        </tr>
                        <tr>
                            <td>Password</td>
                            <td>{{ object.password }}</td>    <!-- (3) -->
                        </tr>
                        <tr>
                            <td>URL</td>
                            <td>{{ object.url }}</td>    <!-- (4) -->
                        </tr>
                    </table>
                </div>
                <div class="card-footer">
                    <div class="d-flex" style="justify-content: space-between; align-items: center;">
                        <button type="submit" class="btn btn-warning">Yes, I'm sure</button>
                        <a href="{% url 'password_manager_list' %}">No, take me back</button>
                    </div>
                </div>
            </div>
        </form>
    </div>
</div>
{% endblock content %}
password_delete.html serves as the template for PasswordManagerDeleteView (views.py). Let's break down the Jinja expressions used in password_delete.html:
(1) {{ object.name }}: Retrieves PasswordManager object's name.
(2) {{ object.username }}: Retrieves PasswordManager object's username.
(3) {{ object.password }}: Retrieves PasswordManager object's password.
(4) {{ object.url }}: Retrieves PasswordManager object's url.
password_detail.html
Create the password_detail.html with the following code:
{% extends 'passwordmanager/base.html' %}

{% block content %}
<div class="row mb-4">
    <div class="col d-flex justify-content-end">
        <a href="{% url 'password_manager_list' %}" class="btn btn-primary btn-sm">
            < Go back to the list</a>
    </div>
</div>
<div class="row">
    <div class="col-md-6 offset-md-3">
        <table class="table">
            <tr>
                <th>Id</th>
                <td>{{ object.id }}</td>
            </tr>
            <tr>
                <th>Title</th>
                <td>{{ object.name }}</td>
            </tr>
            <tr>
                <th>Username</th>
                <td>{{ object.username }}</td>
            </tr>
            <tr>
                <th>Password</th>
                <td>{{ object.password }}</td>
            </tr>
            <tr>
                <th>URL</th>
                <td>{{ object.url }}</td>
            </tr>
            <tr>
                <th>Created date</th>
                <td>{{ object.datestamp }}</td>
            </tr>
        </table>
    </div>
</div>
{% endblock content %}
password_detail.html serves as the template for PasswordManagerDetailView (views.py).
password_list.html
Create the password_list.html with the following code:
{% extends 'passwordmanager/base.html' %}
{% block content %}
<div class="row mb-4">
<div class="col">
{% if user.is_authenticated %} <!-- (1) -->
<h6>{{ user }}'s Primary Vault</h6>
{% endif %}
</div>
<div class="col d-flex justify-content-end">
<a href="{% url 'password_manager_add' %}" class="btn btn-primary btn-sm">+ Add new credential</a>
</div>
</div>
<div class="row">
<div class="col">
{% if object_list %}
<table class="table">
<thead>
<tr>
<th></th>
<th>Username</th>
<th>Password</th>
<th>URL</th>
<th></th>
</tr>
{% for post in object_list %} <!-- (2) -->
<tr>
<td>{{ post.name }}</td>
<td>{{ post.username }}</td>
<td class="d-none">
<input type="text" class="form-control" id="validationDefault02" placeholder="Last name"
value="Otto" disabled>
</td>
<td>
<span id="passwordForPost{{ post.id }}">{{ post.password }}</span>
<span class="badge copyToClipboard" id="cpPwdBtnForPost{{ post.id }}"
data-clipboard-target="#passwordForPost{{ post.id }}">
📋
</span>
</td>
<td>
<a href="{{ post.url|lower }}" target="_blank">{{ post.url|lower }}</a>
</td>
<th class="d-flex justify-content-end">
<a href="{% url 'password_manager_detail' post.pk %}"
class="btn btn-info btn-sm">Detail</a>
<a href="{% url 'password_manager_update' post.pk %}"
class="btn btn-warning btn-sm">Update</a>
<a href="{% url 'password_manager_delete' post.pk %}" class="btn btn-danger btn-sm">Delete</a>
</th>
</tr>
{% endfor %}
</thead>
</table>
{% else %}
<div class="alert alert-warning">No records found!</div>
{% endif %}
</div>
</div>
{% endblock content %}
{% block footer %}
<script>
{% for post in object_list %}
new ClipboardJS('#cpPwdBtnForPost{{ post.id }}');
{% endfor %}
</script>
{% endblock footer %}password_list.html serves as the template for PasswordManagerListView (views.py). Let's break down the Jinja expressions used in password_list.html:
(1) {% if user.is_authenticated %} ... It checks whether the user is authenticated. If so, will render content what is inside of it.
(2) {% for post in object_list %}... For loop over the list of objects (object_list), where each object represents PasswordManager.
(3) {% block footer %}... Contains a script that uses the ClipboardJS library [23] to enable copying passwords to the clipboard.
password_update.html
Create the password_update.html with the following code:
{% extends 'passwordmanager/base.html' %}

{% block content %}
<div class="row">
    <div class="col-md-6 offset-md-3">
        <form method="post">
            {% csrf_token %}
            <div class="card">
                <div class="card-header">
                    <h5>Edit {{ object.name }} credential</h5>
                </div>
                <div class="card-body">
                    <div class="mb-3">
                        <label for="id_name" class="form-label">Title</label>
                        <!-- (1) -->
                        <input type="text" class="form-control" id="id_name" name="name" maxlength="200" required="" value="{{ object.name }}">
                    </div>
                    <div class="mb-3">
                        <label for="id_username" class="form-label">Username</label>
                        <input type="text" class="form-control" id="id_username" name="username" required="" value="{{ object.username }}">
                    </div>
                    <div class="mb-3">
                        <label for="id_password" class="form-label">Password</label>
                        <input type="text" class="form-control" id="id_password" name="password" required="" value="{{ object.password }}">
                    </div>
                    <div class="mb-3">
                        <label for="id_url" class="form-label">URL</label>
                        <input type="text" class="form-control" id="id_url" name="url" required="" value="{{ object.url }}">
                    </div>
                </div>
                <div class="card-footer">
                    <div class="d-flex" style="justify-content: space-between; align-items: center;">
                        <button type="submit" class="btn btn-warning">Update</button>
                        <a href="{% url 'password_manager_list' %}">No, take me back</button>
                    </div>
                </div>
            </div>
        </form>
    </div>
</div>
{% endblock content %}
password_update.html serves as the template for PasswordManagerUpdateView (views.py). Let's break down the Jinja expressions:
... value="{{ object.name }}"> retrieves PasswordManager object's name and puts into value attribute of input tag.
Same goes for {{ object.username }}, {{ object.password }} and {{ object.url }}
URLs
The next step is configure URLs. Update easy_password_manager/urls.py with the following code:
#easy_password_manager/urls.py

 1 | from django.contrib import admin
 2 | from django.urls import path, include
 3 |
 4 | from passwordmanager.views import (
 5 |     PasswordManagerListView,
 6 |     PasswordManagerCreateView,
 7 |     PasswordManagerDetailView,
 8 |     PasswordManagerUpdateView,
 9 |     PasswordManagerDeleteView
10 | )
11 |
12 | urlpatterns = [
13 |     path('admin/', admin.site.urls),
14 |     path('<int:pk>/', PasswordManagerDetailView.as_view(), name='password_manager_detail'),
15 |     path('<int:pk>/edit/', PasswordManagerUpdateView.as_view(), name='password_manager_update'),
16 |     path('<int:pk>/delete/', PasswordManagerDeleteView.as_view(), name='password_manager_delete'),
17 |     path('create', PasswordManagerCreateView.as_view(), name='password_manager_add'),
18 |     path('', PasswordManagerListView.as_view(), name='password_manager_list'),
19 | ]
From line 4 to 10, we are importing all the views from views.py.
On line 12, we define urlpatterns for those views. For e.g., path('<int:pk>/', PasswordManagerDetailView.as_view(), name='password_manager_detail'),
The url path will look like 127.0.0.1/100
name= can be used in Jinja expression, for e.g., <a href="{% url 'password_manager_detail' %}"...
Note:
No need to make any changes to other files, i.e., admin.py, apps.py, __init__.py, migrations, we can happily skip those for this tutorial.
Static directory
Futhermore, create a folder name static, to put all required .css, .js, etc
(venv) $ pwd
.../easy-password-manager
(venv) $ mkdir static && cd static #Must be in project's rootNow,
(1) Copy theme/bootstrap.min.css into static directory.
(2) Copy theme/style.css into static directory.
Static directory tree
.
├── easy_password_manager
│   ...
├── passwordmanager
│   ...
├── static  <-- new
│   ├── bootstrap.min.css  <-- new
│   └── style.css  <-- new
└── ...
Settings
Update settings.py as mentioned below:
...
from pathlib import Path
import os  #new

...
INSTALLED_APPS = [
    ...
    'django.contrib.staticfiles',
    'passwordmanager.apps.PasswordmanagerConfig',  #new
]

...
TEMPLATES = [
    {
        'BACKEND': 'django.template.backends.django.DjangoTemplates',
        'DIRS': [os.path.join(BASE_DIR, 'templates')],  #new
        ....
    },
]

...
STATIC_URL = 'static/'
STATICFILES_DIRS = [os.path.join(BASE_DIR, 'static')]  #new
...
Second migration
This time we will make migrations for the second time to the passwordmanager app.
First, stop the server by ^C (ctrl + c). Then do the following:
(venv) $ pwd
.../easy-password-manager
(venv) $ python3 manage.py makemigrations
Migrations for 'passwordmanager':
passwordmanager/migrations/0001_initial.py
- Create model PasswordManager(venv) $ python3 manage.py migrate
Operations to perform:
Apply all migrations: admin, auth, contenttypes, passwordmanager,
sessions
Running migrations:
Applying passwordmanager.0001_initial... OK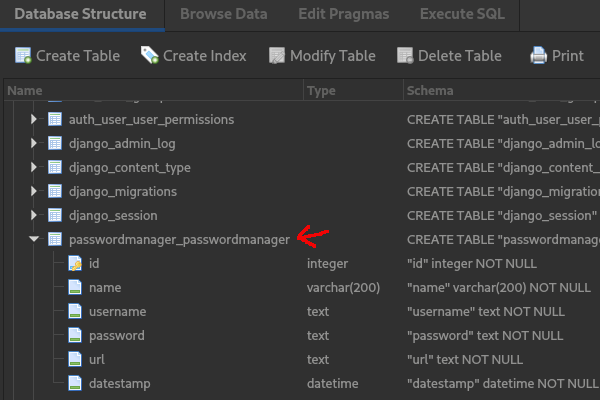
figure 6. passwordmanager_passwordmanager table created as a result of second migration (software used: DB Browser for SQLite).
Run the server and browse 127.0.0.1:8000
(venv) $ python3 manage.py runserver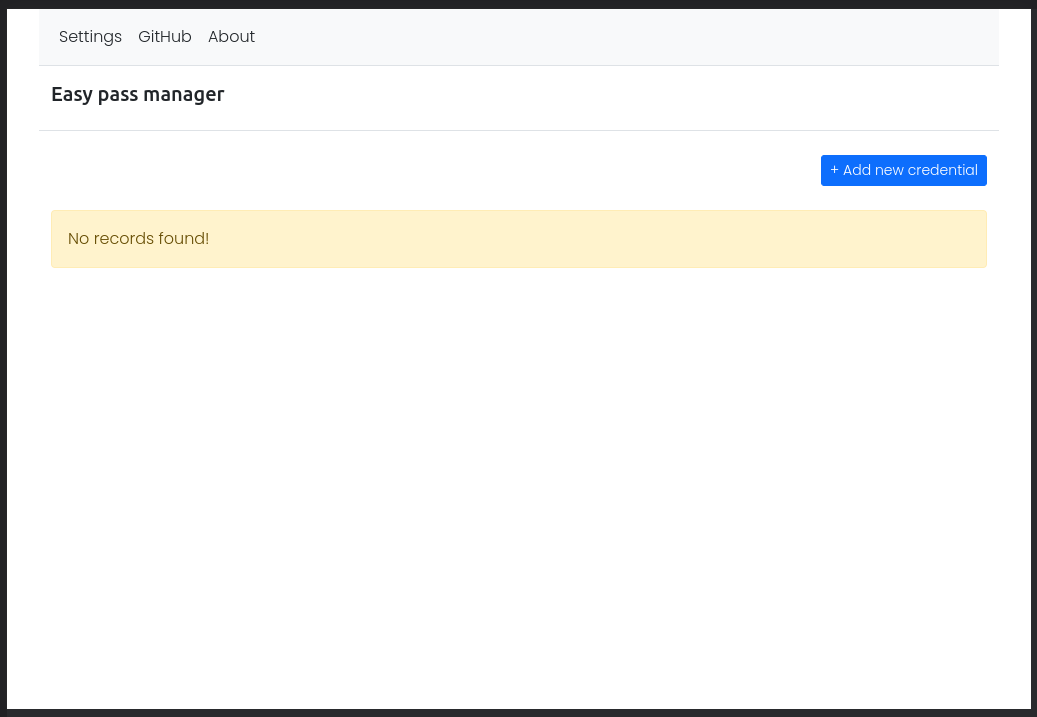
figure 7. Browsing 127.0.0.1:8000/
Stop the server and update git before moving on to the next section
(venv) $ git add .
(venv) $ git commit -m "authorization added"
Authorization
"Authorization is the process of determining exactly what an authenticated party can do" [7]. In Django, a simple way to limit access to unauthenticated users is by using the LoginRequiredMixin [8]. Let's go ahead and make some updates to the code base.
Update views
First, stop the server by pressing ^c (ctrl + c). And update views.py as mentioned below:
from django.contrib.auth import logout  #new
from django.shortcuts import redirect  #new
from django.contrib.auth.mixins import LoginRequiredMixin  #new
from django.views.generic import ListView, DetailView, CreateView
from django.views.generic.edit import UpdateView, DeleteView
from django.urls import reverse_lazy
from .models import PasswordManager

class PasswordManagerCreateView(LoginRequiredMixin, CreateView):    #update
    model = PasswordManager
    template_name = 'passwordmanager/password_add.html'
    fields = '__all__'
    login_url = 'login'  #new

class PasswordManagerListView(LoginRequiredMixin, ListView):        #update
    model = PasswordManager
    template_name = 'passwordmanager/password_list.html'
    login_url = 'login'  #new

class PasswordManagerUpdateView(LoginRequiredMixin, UpdateView):    #update
    model = PasswordManager
    template_name = 'passwordmanager/password_update.html'
    fields = '__all__'
    login_url = 'login'  #new

class PasswordManagerDeleteView(LoginRequiredMixin, DeleteView):    #update
    model = PasswordManager
    template_name = 'passwordmanager/password_delete.html'
    success_url = reverse_lazy('password_manager_list')
    login_url = 'login'  #new

class PasswordManagerDetailView(LoginRequiredMixin, DetailView):    #update
    model = PasswordManager
    template_name = 'passwordmanager/password_detail.html'
    login_url = 'login'  #new

def password_manager_logout(request):  #new
    logout(request)  #new
    return redirect('login')  #new
Explanation:
(1) All view inherits LoginRequiredMixin to ensure only authenticated users can access those views.
(2) password_manager_logout function is created that logs out the current user.
(3) login_url = 'login' redirects unauthenticated user to login page.
Update URLs
Update urls.py
from django.contrib import admin
from django.urls import path, include

from passwordmanager.views import (
    PasswordManagerListView,
    PasswordManagerCreateView,
    PasswordManagerDetailView,
    PasswordManagerUpdateView,
    PasswordManagerDeleteView,
    password_manager_logout  #new
)

urlpatterns = [
    path('accounts/', include('django.contrib.auth.urls')),         #new
    path('logout/', password_manager_logout, name='pm_logout'),     #new
    path('admin/', admin.site.urls),
    path('<int:pk>/', PasswordManagerDetailView.as_view(), name='password_manager_detail'),
    path('<int:pk>/edit/', PasswordManagerUpdateView.as_view(), name='password_manager_update'),
    path('<int:pk>/delete/', PasswordManagerDeleteView.as_view(), name='password_manager_delete'),
    path('create', PasswordManagerCreateView.as_view(), name='password_manager_add'),
    path('', PasswordManagerListView.as_view(), name='password_manager_list'),
]
Add login.html
By default Django looks into login.html from templates/registration folder which needs to be in root folder
.
├── easy_password_manager
├── passwordmanager
├── static
├── templates  <-- new
│       └── registration  <-- new
│               └── login.html  <-- new
└── ...
(venv) $ mkdir templates && cd templates
(venv) $ mkdir registration && cd registration
(venv) $ touch login.htmlAdd the following html template to login.html
1  {% load static %}
2  <!doctype html>
3  <html lang="en">
4
5  <head>
6      <meta charset="utf-8">
7      <meta name="viewport" content="width=device-width, initial-scale=1">
8      <meta name="author" content="www.amaharjan.de">
9      <title>Easy Password Manager</title>
10
11     <!-- CSS -->
12     <link href="{% static 'bootstrap.min.css' %}" rel="stylesheet">
13     <link href="{% static 'style.css' %}" rel="stylesheet">
14  </head>
15
16  <body id="loginPage" class="text-center">
17      <main>
18          <form method="post">
19              {% csrf_token %}
20
21              <!-- Errors -->
22              {% if form.errors %}
23              <div class="alert alert-danger errors pt-2">
24                  {{ form.errors }}
25              </div>
26              {% endif %}
27
28              <h1 class="h3 mb-3 fw-normal">
29                  Sign in
30              </h1>
31              <div class="form-floating">
32                  <input class="form-control" type="text" name="username" autocomplete="off" autofocus="" autocapitalize="none"
33                      maxlength="150" required="" id="id_username" placeholder="amaharjan">
34                  <label for="id_username">Username</label>
35              </div>
36              <div class="form-floating">
37                  <input class="form-control" type="password" name="password" required="" id="id_password">
38                  <label for="id_password">Password</label>
39              </div>
40              <button type="submit" class="w-100 btn btn-lg btn-primary">Sign in</button>
41              <p class="mt-5 mb-3 text-muted">© www.amaharjan.de | 2023</p>
42          </form>
43      </main>
44  </body>
45  </html>
Here,
In line 1, we are loading static contents for the login.html.
In line 99, CSRF token must be used.
In line 22, if there is an error within the login form, it will display here.
Update base.html
Update base.html (starting from line 27) with the following piece of code:
...
27 <!-- start logout link  -->
28  {% if user.is_authenticated %}
29      <ul class="nav">
30         <li class="nav-item">
31              <a href="{% url 'pm_logout' %}" class="nav-link link-dark px-2">Logout</a>
32          </li>
33      </ul>
34  {% endif %}
35 <!-- ends logout link  -->
...
Here, the Jinja expression {% if user.is_authenticated %} will display "Logout"; only if the user is authenticated.
Update settings
Finally, make changes to the settings.py at the bottom of the page:
LOGIN_REDIRECT_URL = 'password_manager_list'
LOGOUT_REDIRECT_URL = 'login'
Once again, run the server and browse 127.0.0.1:8000
(venv) $ python3 manage.py runserverYou should be able to see that the unauthenticated user will be redirect to the login page.
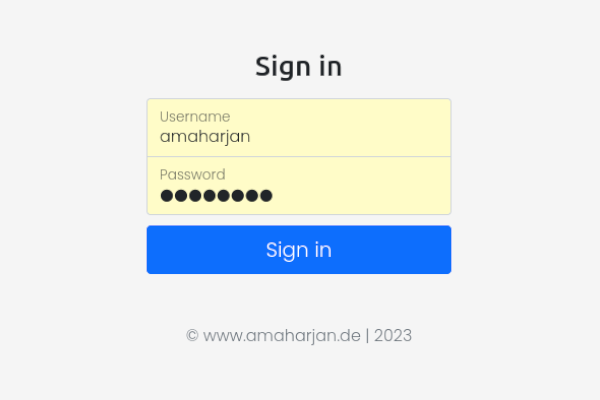
figure 8. Django project login page.
Stop the server and update git before moving on to the next section
(venv) $ git add .
(venv) $ git commit -m "authorization added"
Testing
"Code without tests is broken by design" [24]. So, in this final chapter, let's explore some test cases for the project. We'll name this set of tests PasswordManagerTest, and it will include:
(1) Ensuring that the data saved in PasswordManager matches the expected values.
(2) Verifying that all views response codes are "okay".
from django.contrib.auth import get_user_model
from django.test import TestCase
from django.urls import reverse
from .models import PasswordManager

class PasswordManagerTest(TestCase):

    #Setup initial data for the test
    def setUp(self):

        self.user = get_user_model().objects.create_user(    # <--Setup `testuser`
            username='testuser',
            email='test@example.com',
            password='password'
        )

        self.pm = PasswordManager.objects.create(    # <--Creates a `PasswordManager` object
            name='gmail',
            username='testuser@gmail.com',
            password='password',
            url='gmail.com'
        )

    def test_password_manager_content(self):
        '''
        Assert if the data saved in PasswordManager matches.
        '''
        self.assertEqual(f'{self.pm.name}', 'gmail')
        self.assertEqual(f'{self.pm.username}', 'testuser@gmail.com')
        self.assertEqual(f'{self.pm.password}', 'password')
        self.assertEqual(f'{self.pm.url}', 'gmail.com')

    def test_password_manager_list_view(self):
        '''
        Assert if the `PasswordManagerListView` is 200 OK.
        '''
        self.client.login(username='testuser', password='password')    # <--To login the user
        response = self.client.get(reverse('password_manager_list'))
        self.assertEqual(response.status_code, 200)

    def test_password_manager_detail_view(self):
        '''
        Assert if the `PasswordManagerDetailView` is 200 OK.
        '''
        self.client.login(username='testuser', password='password')
        response = self.client.get('/1/')
        self.assertEqual(response.status_code, 200)

    def test_password_manager_delete_view(self):
        '''
        Assert if the `PasswordManagerDeleteView` is 302.
        '''
        self.client.login(username='testuser', password='password')
        response = self.client.post('/1/delete/')
        self.assertEqual(response.status_code, 302)

    def test_password_manager_update_view(self):
        '''
        Assert if the `PasswordManagerUpdateView` is 200 or 302.
        '''
        self.client.login(username='testuser', password='password')
        update_url = reverse('password_manager_update', kwargs={'pk': self.pm.pk})
        response_get = self.client.get(update_url)
        self.assertEqual(response_get.status_code, 200)

        updated_data = {
            'username':'newuser'
        }

        response_post = self.client.post(update_url, data=updated_data)
        self.assertIn(response_post.status_code, [200, 302])
        self.pm.refresh_from_db()
Line 10: The setUp method initializes initial data for the test.
Line 18: PasswordManager.objects.create creates a PasswordManager database object.
Line 26: test_password_manager_content() asserts if the saved data in PasswordManager matches.
Line 36: test_password_manager_list_view(), a test case for PasswordManagerListView.
Line 45: test_password_manager_detail_view(), a test case for PasswordManagerDetailView.
Line 54: test_password_manager_delete_view(), a test case for PasswordManagerDeleteView.
Line 64: test_password_manager_update_view(), a test case for PasswordManagerUpdateView.
Finally, run the testcases with the following command
(venv) $ python3 manage.py testResult
Found 5 test(s).
Creating test database for alias 'default'...
System check identified no issues (0 silenced).
.....
----------------------------------------------------------------------
Ran 5 tests in 2.064s

OK
Destroying test database for alias 'default'...
Overall project structure
The overall project folder and file structure now looks like this
.
└── easy-password-manager
    ├── db.sqlite3
    ├── easy_password_manager
    │   ├── asgi.py
    │   ├── __init__.py
    │   ├── settings.py
    │   ├── urls.py
    │   └── wsgi.py
    ├── LICENSE
    ├── manage.py
    ├── passwordmanager
    │   ├── apps.py
    │   ├── __init__.py
    │   ├── migrations
    │   │   ├── 0001_initial.py
    │   │   └── __init__.py
    │   ├── models.py
    │   ├── templates
    │   │   └── passwordmanager
    │   │       ├── base.html
    │   │       ├── password_add.html
    │   │       ├── password_delete.html
    │   │       ├── password_detail.html
    │   │       ├── password_list.html
    │   │       └── password_update.html
    │   ├── tests.py
    │   └── views.py
    ├── README.md
    ├── requirements.txt
    ├── static
    │   ├── bootstrap.min.css
    │   └── style.css
    ├── templates
    │   └── registration
    │       └── login.html
    └── theme
        ├── bootstrap.min.css
        ├── create.html
        ├── delete.html
        ├── detail.html
        ├── index.html
        ├── login.html
        ├── style.css
        └── update.html

11 directories, 34 files
Moving further
Awesome, you've just created a Django web project successfully. If you have any question or feedback, feel free to reach out to me at hello@amaharjan.com.
Happy coding!
Some of the best sources, in my humble opinion, for learning more about Django and Python include:
- docs[.]djangoproject[.]com ↗
- Django for Beginners by William S. Vincent ↗
- Python Crash Course, 2nd Edition ↗
- Two Scoops of Django 3.x ↗
Source code
https://github.com/asis2016/easy-password-manager
References
- [1] “Django,” Django Project. https://www.djangoproject.com/ (accessed Dec. 28, 2023).
- [2] R. Johns, “Want To Level Up In Web Development? Use Web Development Frameworks!,” Hackr.io. Accessed: Dec. 28, 2023. [Online]. Available: https://hackr.io/blog/web-development-frameworks
- [3] “Django Project MVT Structure,” GeeksforGeeks, Sep. 20, 2019. Accessed: Dec. 28, 2023. [Online]. Available: https://www.geeksforgeeks.org/django-project-mvt-structure/
- [4] Akolade, “Django MVT: An Introduction to the Model-View-Template Architecture of a Django App,” DEV Community, Feb. 13, 2023. Accessed: Dec. 28, 2023. [Online]. Available: https://dev.to/akolade/django-mvt-an-introduction-to-the-model-view-template-architecture-of-a-django-app-23b9
- [5] R. Gour, “Working Structure of Django MTV Architecture,” Towards Data Science, Apr. 16, 2019. Accessed: Dec. 28, 2023. [Online]. Available: https://towardsdatascience.com/working-structure-of-django-mtv-architecture-a741c8c64082
- [6] “Django Project MVT Structure,” GeeksforGeeks, Sep. 20, 2019. Accessed: Dec. 28, 2023. [Online]. Available: https://www.geeksforgeeks.org/django-project-mvt-structure/
- [7] F. Shadhin, “The MVT Design Pattern of Django,” Python in Plain English, Sep. 13, 2021. Accessed: Dec. 28, 2023. [Online]. Available: https://python.plainenglish.io/the-mvt-design-pattern-of-django-8fd47c61f582#8b6c
- [8] “Git,” gitignore Documentation. https://git-scm.com/docs/gitignore (accessed Dec. 21, 2023).
- [9] “12. Virtual Environments and Packages,” Python documentation. https://docs.python.org/3/tutorial/venv.html (accessed Dec. 21, 2023).
- [10] jQN, “Build A Django Blog — Part 01 - jQN,” Medium, Feb. 09, 2021. Accessed: Dec. 28, 2023. [Online]. Available: https://jqn.medium.com/100daysofcode-day-0-73d2c6a71e69
- [11] “ASGI — Channels 4.0.0 documentation.” https://channels.readthedocs.io/en/latest/asgi.html (accessed Dec. 21, 2023).
- [12] A. Ryabtsev, “Configuring Django Settings: Best Practices,” Django Stars, Apr. 08, 2019. https://djangostars.com/blog/configuring-django-settings-best-practices/ (accessed Dec. 21, 2023).
- [13] “Django,” Django Project. https://docs.djangoproject.com/en/5.0/topics/http/urls/ (accessed Dec. 21, 2023).
- [14] H. Tandukar, “What Is WSGI (Web Server Gateway Interface)?,” Built In, Jul. 10, 2023. https://builtin.com/data-science/wsgi (accessed Dec. 21, 2023).
- [15] “Django,” Django Project. https://docs.djangoproject.com/en/1.8/intro/tutorial01/ (accessed Dec. 21, 2023).
- [16] ironman, “Purpose of admin.py file in app in Django project?,” Stack Overflow. https://stackoverflow.com/questions/47752994/purpose-of-admin-py-file-in-app-in-django-project (accessed Dec. 21, 2023).
- [17] “Exploring Project Structure & Creating Django App,” JetBrains Guide, Feb. 17, 2023. https://www.jetbrains.com/guide/django/tutorials/django-aws/project-explore (accessed Dec. 22, 2023).
- [18] “Django Views.” https://www.w3schools.com/django/django_views.php (accessed Dec. 21, 2023).
- [19] “Django,” Django Project. https://docs.djangoproject.com/en/5.0/topics/migrations/ (accessed Dec. 22, 2023).
- [20] DanielTheRocketMan, “How is python manage.py createsuperuser useful?,” Stack Overflow. https://stackoverflow.com/questions/27472581/ (accessed Dec. 23, 2023).
- [21] “django.urls.reverse_lazy Example Code,” Full Stack Python. https://www.fullstackpython.com/django-urls-reverse-lazy-examples.html (accessed Dec. 23, 2023).
- [22] W. S. Vincent, Django for Beginners: Build websites with Python and Django. WelcomeToCode, 2022.
- [23] “clipboard.js.” https://clipboardjs.com/ (accessed Dec. 23, 2023).
- [24] R. C. Martin, Clean Code: A Handbook of Agile Software Craftsmanship. Pearson Education, 2008.