Table of Contents
- Tech Stack
- Nginx installation
- Edit index.html
- Edit nginx.conf
- Self-signed certificate
Tech stack
- OS: CentOS Steam 8
- Web Server: Nginx
NGINX is open source software that is widely used as web server, reverse proxy, caching, load balancing, et cetera [n00].
Nginx installation
First of all, install Nginx on your machine, update repository file for the YUM package manager:
$ sudo vi /etc/yum.repos.d/nginx.repoPaste the following:
[nginx]
name=nginx repo
baseurl=https://nginx.org/packages/centos/$releasever/$basearch/
gpgcheck=0
enabled=1
Install, enable and start the Nginx:
$ sudo dnf -y install nginx
$ sudo systemctl enable nginx
$ sudo systemctl start nginx
Add http in the firewall rule:
$ sudo firewall-cmd --permanent --add-service=http
$ sudo firewall-cmd --reload
Figure 1. Add http firewall rule and reload.
Edit index.html
Edit your index.html file as mentioned-below:
$ sudo vi /usr/share/nginx/html/index.html<!DOCTYPE html>
<html lang="en">
<head>
<meta charset="UTF-8">
<meta name="viewport" content="width=device-width, initial-scale=1.0">
<title>Hello World</title>
</head>
<body>
<h1>Hello World!</h1>
</body>
</html>Test the Nginx configuration and restart if everything is OK:
$ sudo nginx -t
$ sudo systemctl restart nginx
$ systemctl status nginx
Edit nginx.conf
Note: nginx.conf is the main configuration file for your Nginx web server.
Open and review nginx.conf which is located inside etc/nginx
...
    ssl_certificate "/etc/pki/nginx/server.crt";
    ssl_certificate_key "/etc/pki/nginx/server.key";
...
Self-signed certificate
First of all create a directory called pki (can be anything):
$ sudo mkdir -p ~/pki
$ cd ~/pki
Secondly, by using the following command; it generates the private key through RSA algorigthm ↗ with output file called server.key:
$ openssl genpkey -algorithm RSA -out server.keyThirdly create a server.crt (self-signed certificate) by the following command:
$ openssl req -new -key server.key -x509 -days 365 -out server.crt- x509: Instructs OpenSSL to output a self-signed certificate instead of a certificate request.
- days 365: Validity period is 365 days
Complete the required fields as indicated below, making any necessary edits:
-----
Country Name (2 letter code) [XX]:NP
State or Province Name (full name) []:KOSHI
Locality Name (eg, city) [Default City]:EVEREST
Organization Name (eg, company) [Default Company Ltd]:AMAHARJAN.DE
Organizational Unit Name (eg, section) []:ENG
Common Name (eg, your name or your server's hostname) []:amaharjande
Email Address []:hello@amaharjan.de
Now, copy server.crt and server.key to /etc/pki/nginx/:
$ sudo mkdir -p /etc/pki/nginx
$ sudo cp server.crt  /etc/pki/nginx/
$ sudo cp server.key  /etc/pki/nginx/private/
Uncomment etc/nginx/nginx.conf file as shown below:
#Settings for a TLS enabled server.
   server {
       listen       443 ssl http2 default_server;
       listen       [::]:443 ssl http2 default_server;
       server_name  _;
       root         /usr/share/nginx/html;
       ssl_certificate "/etc/pki/nginx/server.crt";
       ssl_certificate_key "/etc/pki/nginx/private/server.key";
       ssl_session_cache shared:SSL:1m;
       ssl_session_timeout  10m;
       ssl_ciphers PROFILE=SYSTEM;
       ssl_prefer_server_ciphers on;
       # Load configuration files for the default server block.
       include /etc/nginx/default.d/*.conf;
       location / {
       }
Restart the webserver:
$ sudo nginx -t
$ sudo systemctl restart nginx
$ systemctl status nginx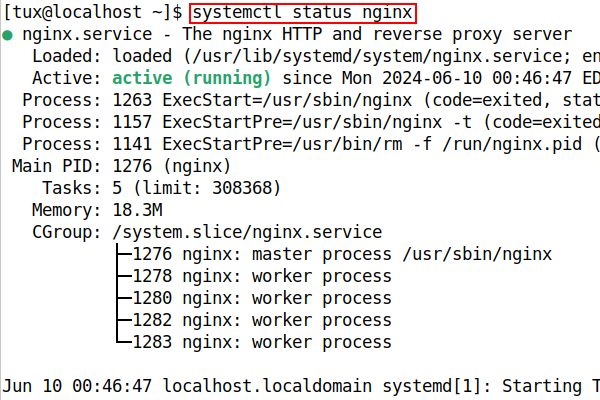
Figure 2. Nginx status
Finally, whitelist https on firewall
$ sudo firewall-cmd --permanent  --add-service=https
$ sudo firewall-cmd --reload
$ sudo firewall-cmd --list-all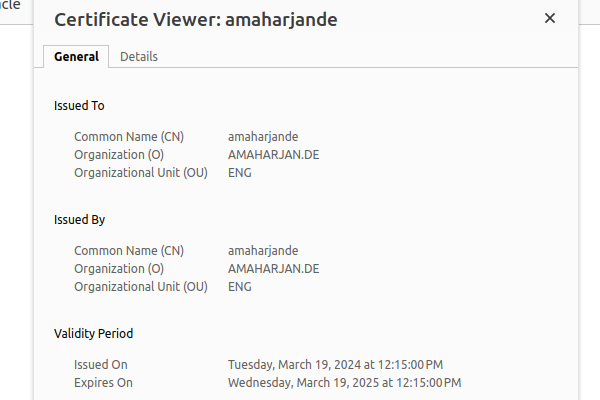
Figure 3. Self-signed certification information when browsed to 192.168.0.2
Final Remark: Self-signed certificates are generally used for development, testing, and internal use. It is highly recommended to use certificates from Certificate Authorities (CAs) for the production environment.
Articles recommended by the author:
References
[n00] “What Is NGINX? - NGINX.” https://www.nginx.com/resources/glossary/nginx/ (accessed Mar. 19, 2024).
[n01] "Install Nginx" https://www.nginx.com/resources/wiki/start/topics/tutorials/install/ (accessed Mar. 19, 2024).