Level
- Beginner to Intermediate
Prerequisite
- Familiar with various Linux distribution
Table of Contents
- Introduction
- Why use SSH?
- OpenSSH Essentials
- Port 22
- SSH Architecture
- The SSH Server
- The SSH Client
- SSH + Two-Factor Authentication (2FA)
- Additional
- OpenSSH server on Windows Server 2022
- PuTTY
- Windows CLI
- Best Practices for Using SSH
- Conclusion
- References
Introduction
The Secure Shell (SSH) protocol, invented by Tatu Ylönen, is a protocol for secure remote login and other secure network services over an insecure network [LoYl06].
Whether you're a developer, sysadmin, power user, or regular user, knowing a good deal about SSH will definitely enhance your productivity and achieve secured way of communication.
It is one of the most common network service utility and the de facto standard for remote access to a Unix machine - a replacement for the insecure yet popular TELNET [Ward14], [Occu18].
Futhermore, SSH as a client/server protocol uses cryptography for confidentiality, integrity, and authentication [Neme11]. The main objective of this protocol is to improve security on the Internet therefore all encryption, integrity, and public key algorithms used are well-known and well-established [LoYl06].
Why use SSH?
- It encrypts all data during its connection, including username and password [Barr16].
- As a result, it protects you from eavesdroppers [Ward14].
- Allows remote management of servers, making it easier to perform administrative tasks.
OpenSSH Essentials
OpenSSH is probably the most widely used Linux SSH service, basically it is a suite of secure networking software/tools based on the SSH protocol [Occu18]. The suite includes several commands, as listed in the table below:
| Command | Description |
|---|---|
| ssh | It is the client |
| sshd | The server daemon |
| ssh-keygen | For generating public/private key pairs |
| ssh-add & ssh-agent | Tools for managing authentication keys |
| ssh-keyscan | Retrieves public keys from servers |
| sftp-server | File transfer over SFTP |
| sftp and scp | File transfer client utilities |
Table 1. OpenSSH command list and descriptions based on [Neme11].
Port 22
SSH uses port number 22 for communication. You can find this information in /etc/services.
$ cat /etc/services | grep ssh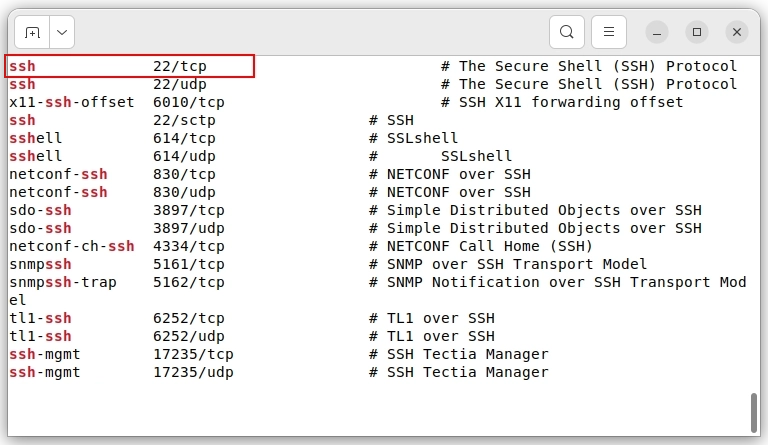
Figure 1. Locating the SSH Service
In addition, it operates at the application layer in the Internet Protocol Suite.
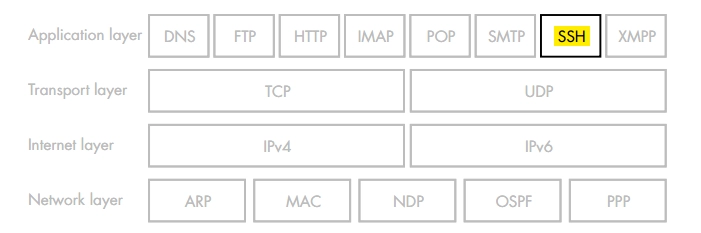
Figure 2. Internet Protocol Suite based on [Mcdo20]
| Service name | Port number | Transport protocol | Reference |
|---|---|---|---|
| ssh | 22 | tcp/udp | RFC4251 |
Table 2. SSH service description based on www.iana.org.
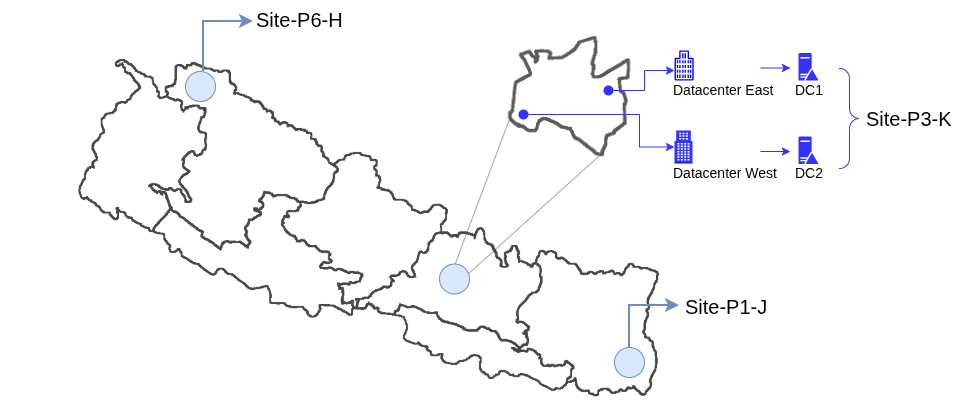
SSH Architecture
In this section, I will guide you through implementing various SSH architectural components as depicted in Figure 3.
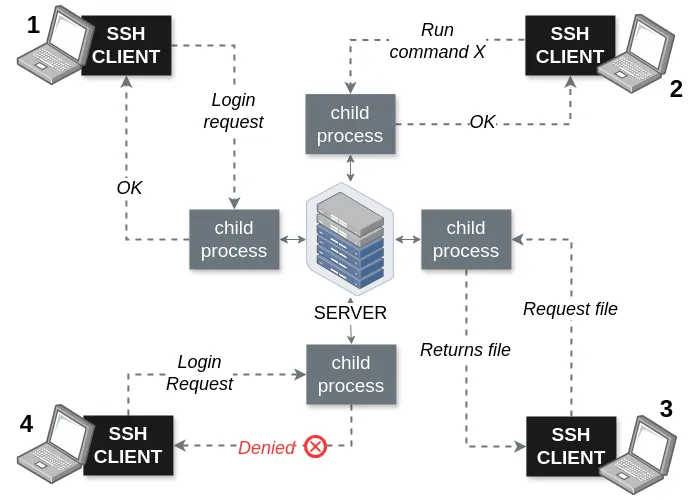
Figure 3. SSH architecture based on [BaSi01]
1. The SSH Server
For demonstration purposes, I have set up the following Linux server
| Name | IP |
|---|---|
| hogwarts | 192.168.0.100 |
| gryffindor | 192.168.0.101 |
| ravenclaw | 192.168.0.102 |
By default, SSH is installed on nearly all Linux distributions. To check if it is installed on Fedora, use the following command:
$ yum list installed | grep ssh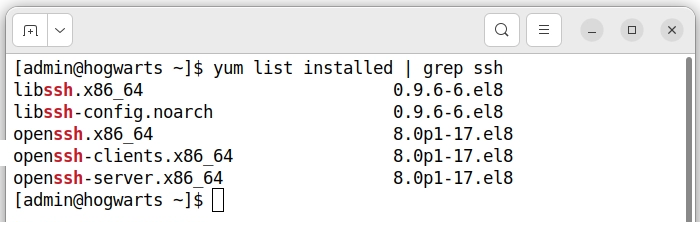
Figure 4. Yum installed list
On Ubuntu, to install the SSH server, follow these instructions:
$ sudo dpkg --list | grep opensshIf nothing is found, continue:
$ sudo apt-get install openssh-server
Figure 5. Installing OpenSSH Server on Ubuntu
Clearly, you need to verify if the server has been set up.
$ systemctl status ssh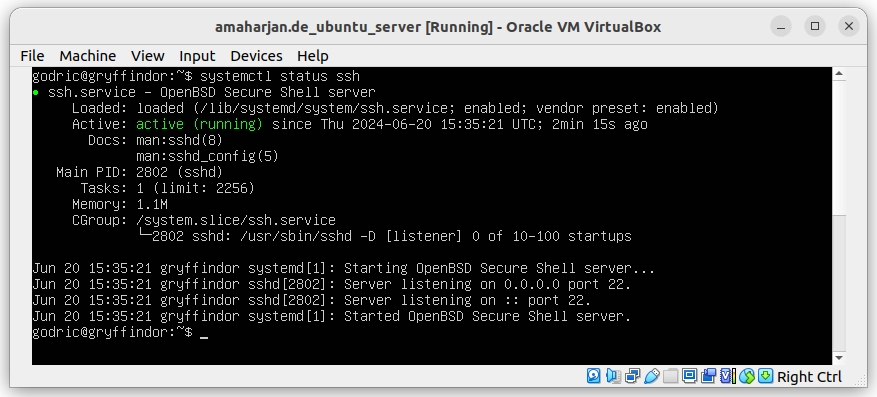
Figure 6. Verifying SSH server status using systemctl status ssh
2. The SSH Client
To start with, the basic SSH client syntax is
ssh [options] [username@]host [command]Here, I've provided a list of hostnames and IP addresses based on Figure 3 for easier reference during the upcoming practical demonstration. Please note that your environment details may differ, so keep track accordingly.
| # | SSH client (user) | Belongs to | User type |
|---|---|---|---|
| - | admin | hogwarts (192.168.0.100) | sudoer |
| - | dumbledore | hogwarts (192.168.0.100) | sudoer |
| - | harry.potter | hogwarts (192.168.0.100) | normal |
| - | ron.weasley | hogwarts (192.168.0.100) | normal |
| ... | ... | ... | ... |
| - | godric | gryffindor (192.168.0.101) | sudoer |
| 1. | harry.potter | gryffindor (192.168.0.101) | normal |
| - | ron.weasley | gryffindor (192.168.0.101) | normal |
| 2. | dumbledore | gryffindor (192.168.0.101) | sudoer |
| ... | ... | ... | ... |
| - | rowena | ravenclaw (192.168.0.102) | sudoer |
| 3. | luna.lovegood | ravenclaw (192.168.0.102) | normal |
| ... | ... | ... | ... |
| 4. | lord.voldemort | - | - |
Table 3. SSH clients (users) table based on Figure 3: SSH Architecture.
1st scenario - I
Let's examine our first scenario, where a client wants to log in to the server (192.168.0.100).
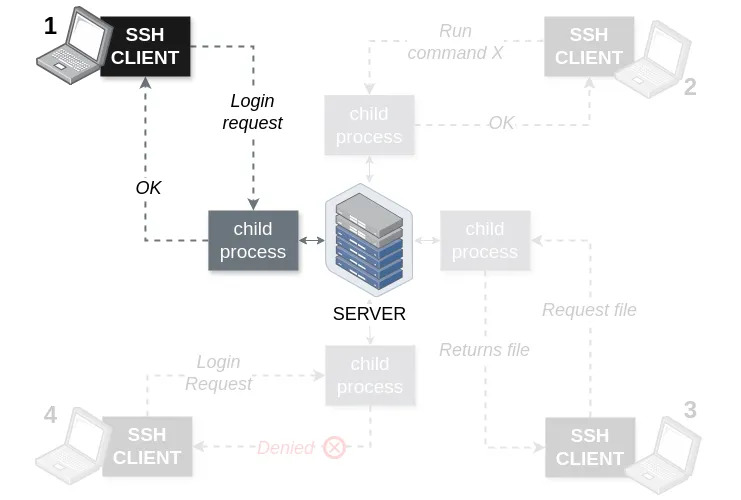
Figure 7. SSH Architecture - first scenario
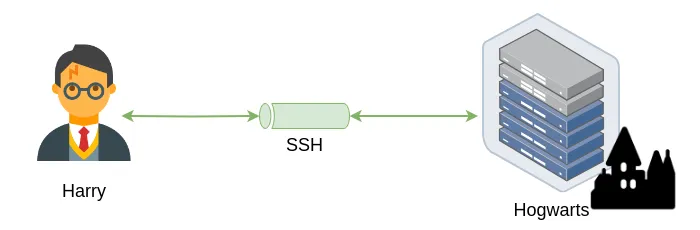
Figure 8. Conceptual diagram derived from Figure 7
Harry wants to log in to the server. Therefore, he needs to run the following command:
$ ssh 192.168.0.100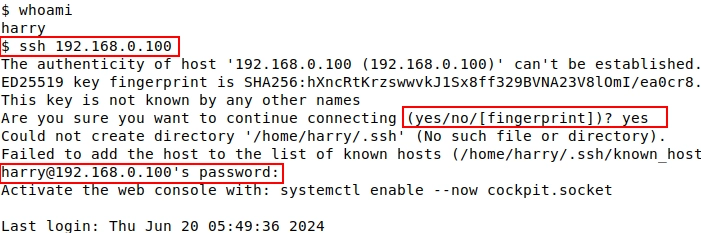
Figure 9. Harry connects to the server using his password
Note:
- This will only work if Harry already has an account and password set up on the server.
- If he doesn't have an account on the server, the sysadmin must add him.
The sysadmin can add Harry to the server using the following command:
$ sudo useradd harry.potter
$ sudo passwd harry.potter
sudo passwd harry.potter will create a password for Harry.
1st scenario - II
This scenario section deals with Public key authentication. It is best method to access remote systems is using public key cryptography to authenticate users to the server.
First, Harry needs to generate a public and private key pair.
Use the following command to generate them:
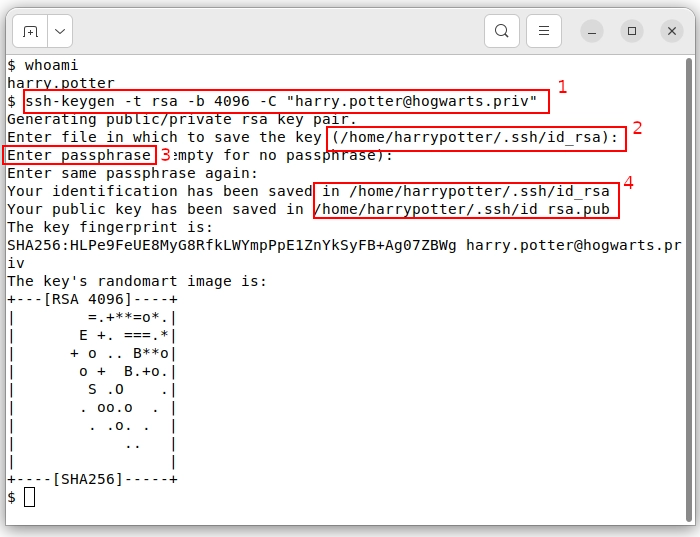
Figure 10. Harry generates public & private keys using ssh-keygen
Step 1. Run ssh-keygen
$ ssh-keygen -t rsa -b 4096 -C "harry.potter@hogwarts.priv"- -t rsa means RSA algorithm will be used
- -b 4096 means key length of 4096 bits will be used
- -C means comments and it is usually an email id
Step 2. /home/harrypotter/.ssh/id_rsa
Location for keys
Step 3. Enter passphrase
To protect your keys, you can enter a passphrase. This adds an extra layer of security.
Step 4. /home/harrypotter/.ssh/
- id_rsa: is a private key. DO NOT SHARE THIS WITH ANYONE!
- id_rsa.pub: This is your public key. Share this with others for various purposes.
As of now, the system administrator should add Harry's id_rsa.pub to the server. Assuming the admin has already received Harry's public key, here are the steps to follow:
# 1. Login to the server (192.168.0.100) as an admin

# 2. Create .ssh directory
$ sudo mkdir -p /home/harry.potter/.ssh

# 3. Set the correct permissions
$ sudo chmod 700 /home/harry.potter/.ssh

# 4. Paste the Harry's id_rsa.pub into authorized_keys
$ sudo vi /home/harry.potter/.ssh/authorized_keys

# 5. Correct permission for authorized_keys
$ sudo chmod 600 /home/harry.potter/.ssh/authorized_keys

# 6. Finally, change the ownership
$ sudo chown -R harry.potter:harry.potter /home/harry.potter/.ssh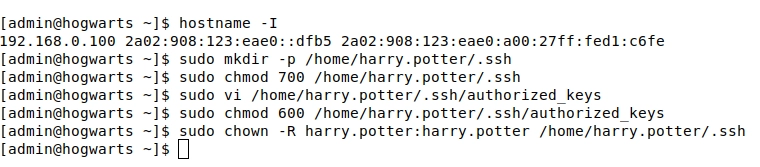
Figure 11. Sysadmin adds Harry's public key to the server
Now, Harry will be able to successfully log in to the server from his machine without needing to use his password.
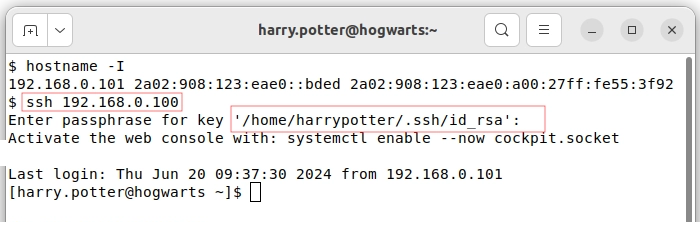
Figure 12. Harry's successful login using public/private key
1st scenario - III
On the contrary, Harry can log in to the server using a sudoer's password, although this is generally considered a bad practice. However, for demonstration purposes, it is acceptable.
As his best friend, Ron, gave his password to Harry without hesitation, here is how Harry can log in to the Hogwarts server:
$ ssh ron.weasley@192.168.0.100ron.weasley@192.168.0.100's password: **********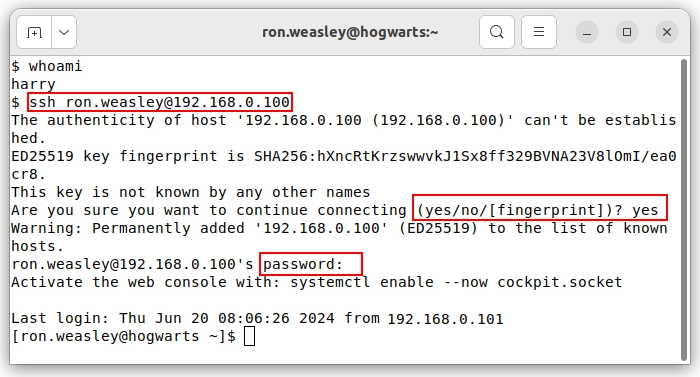
Figure 13. Harry logs into the server using Ron's credentials
2nd scenario
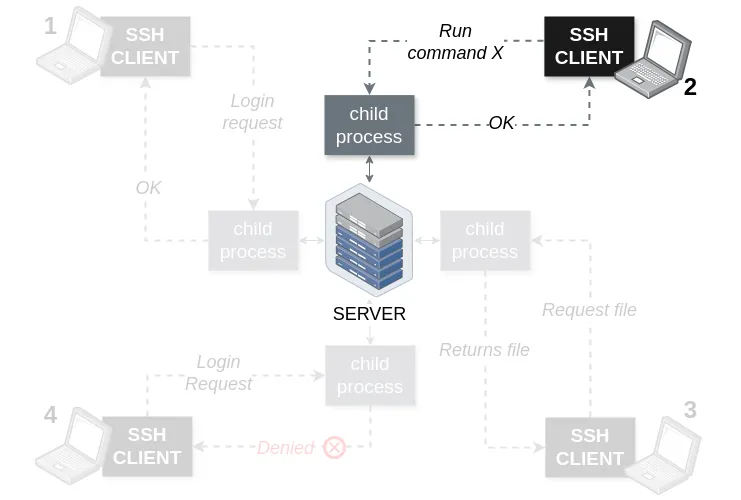
Figure 14. SSH Architecture - second scenario
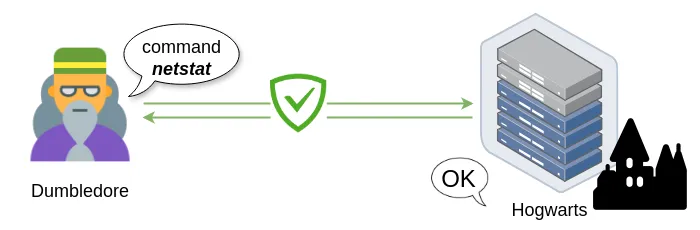
Figure 15. Conceptual diagram derived from Figure 14
For example:
ssh dumbledore@192.168.0.100 hostnameHere:
- Hostname is the command executed by Dumbledore
- Specifying his username and the server IP address, i.e., dumbledore@192.168.0.100
3rd scenario
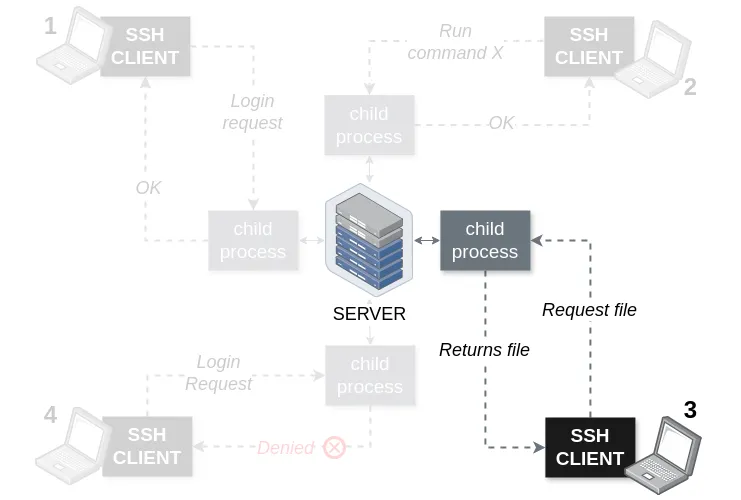
Figure 15. SSH Architecture - third scenario
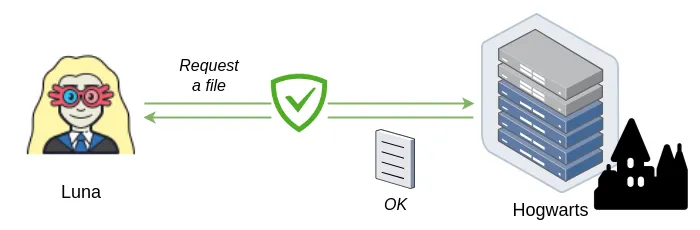
Figure 16. Conceptual diagram derived from Figure 15
When you want to copy a file from the server to your local machine or vice-versa you'll use scp command. It is OpenSSH secure file copy. The scp command is similar to the old UNIX rcp command [NeBr12].
This is how to do it
$ scp /home/luna/quibbler.txt luna@hogwarts:/tmpHere, Luna securely copies quibbler.txt from her machine to the server's tmp directory.
Now, if she want to copy something from the server, this is how she should do it
$ scp luna@hogwarts:/home/luna/school/notes.txt /home/luna/Basically, the syntaxt is:
scp [source] [target]4th scenario
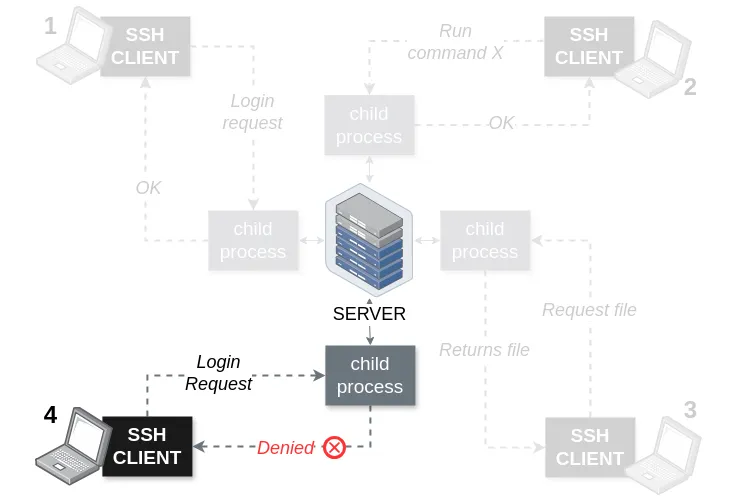
Figure 17. SSH Architecture - fourth scenario
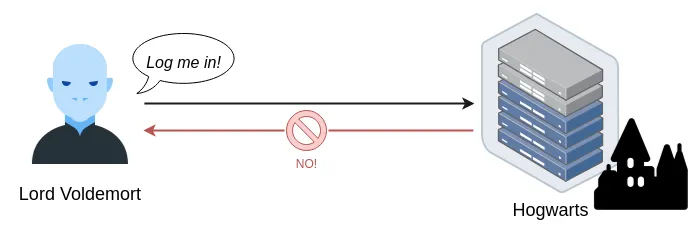
Figure 18. Conceptual diagram derived from Figure 17

Figure 19. Voldemort is denied to the SSH server
SSH + Two-Factor Authentication (2FA)
In this section, I will demonstrate how to configure an SSH server to enforce Two-Factor authentication, based on the original article from the Ubuntu site.
First, login to the Linux server, in my case 192.168.0.101 (gryffindor)
$ ssh godric@192.168.0.101Install Google Authenticator PAM module
$ sudo apt install libpam-google-authenticatorAppend the following line to the end of the /etc/pam.d/sshd file
auth required pam_google_authenticator.soRestart sshd daemon
$ sudo systemctl restart sshd.serviceUpdate /etc/ssh/sshd_config file as mentioned below
# Change to yes to enable challenge-response passwords (beware issues with some PAM modules and threads)
ChallengeResponseAuthentication YES

# Change to no to disable tunnelled clear text passwords
#PasswordAuthentication yes
Now, run the following command
$ google-authenticatorAnswer the questions with the following recommendation
Do you want authentication tokens to be time-based (y/n) y

Do you want me to update your "/home/godric/.google_authenticator" file? (y/n) y

Do you want to disallow multiple uses of the same authentication
token? y

Disallow multiple uses: y

Increase the original generation time limit: n

Do you want to enable rate-limiting? (y/n) y
As a result, QR code will be generated
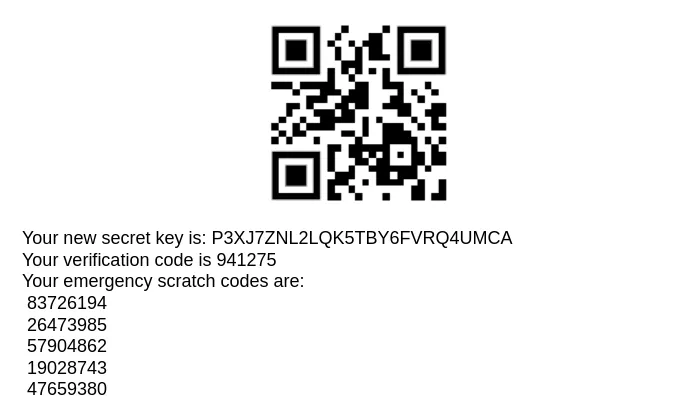
Figure 20. Example of Google Authenticator QR code on the Linux SSH server.
Eventually, I will need to scan this QR code into my Google Authenticator app on my Android or iOS phone. Here are the steps:

Figure 21. Google Authenticator - step 1.
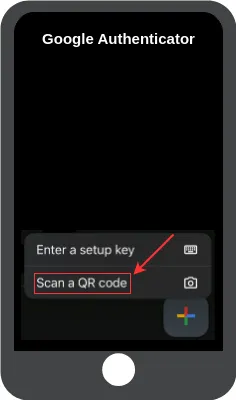
Figure 22. Google Authenticator - step 2.
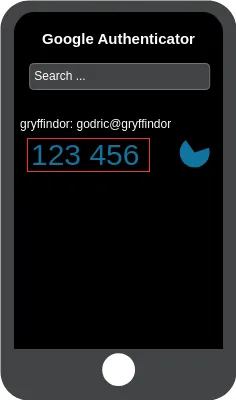
Figure 23. Google Authenticator - step 3.
Finally, try logging in as the user godric to the server at 192.168.0.101. You will be prompted for:
- godric's password
- The verification code from Google Authenticator
$ ssh godric@192.168.0.101

(godric@192.168.0.101) Password: *****
(godric@192.168.0.101) Verification code: *****
Additional
In this additional section, I will be talking about
- Setting up OpenSSH server on Windows Server 2022
- PuTTY
- Windows Command Line Interface
1. OpenSSH setup on Windows Server 2022
- WIP
2. PuTTY
Here's a quick guide on installing and using PuTTY, a popular SSH and telnet client for Windows OS. First, download the software from the official PuTTY website.
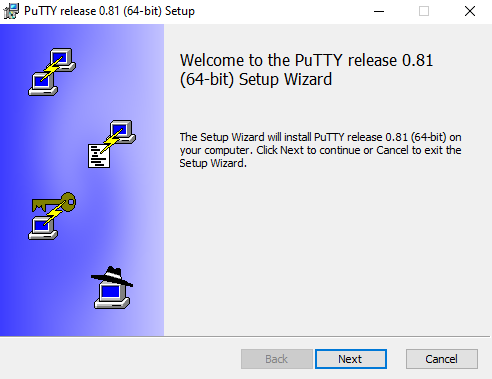
Figure 24. Setting Up PuTTY on Windows - 1.
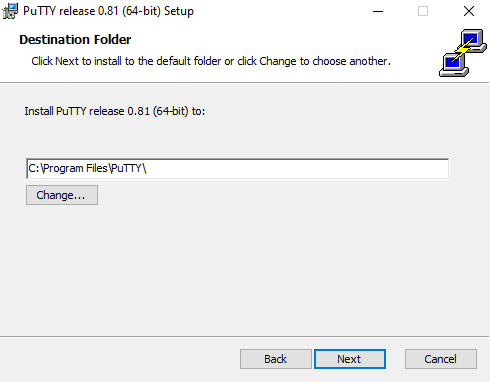
Figure 25. Setting Up PuTTY on Windows - 2.
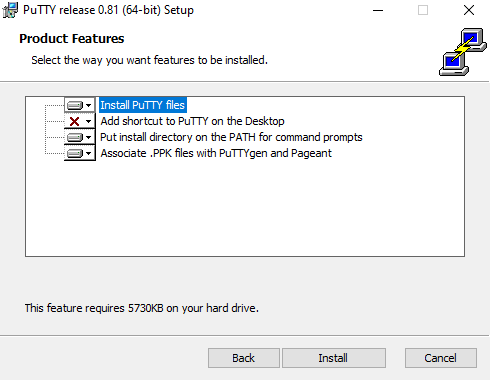
Figure 26. Setting Up PuTTY on Windows - 3.
Figure 27. Setting Up PuTTY on Windows - 4.
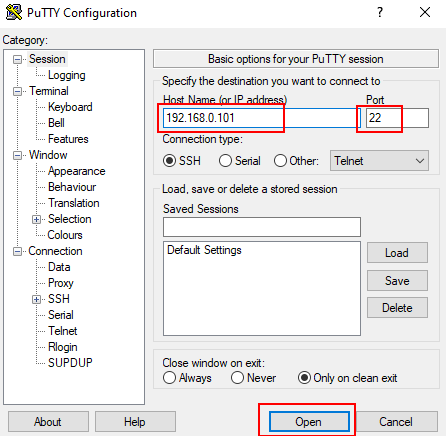
Figure 28. Connecting to the SSH server (192.168.0.101).
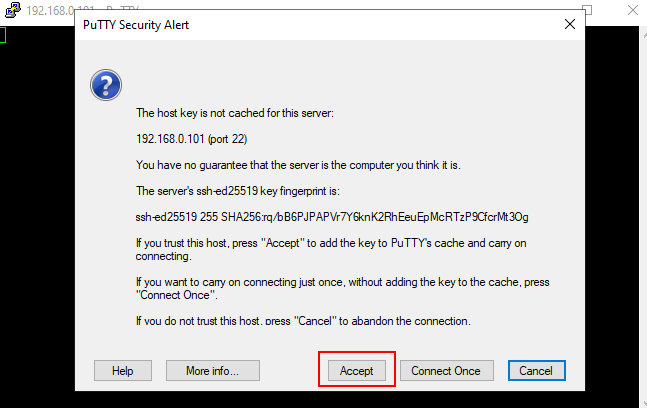
Figure 29. PuTTY security alert before connecting to the server.
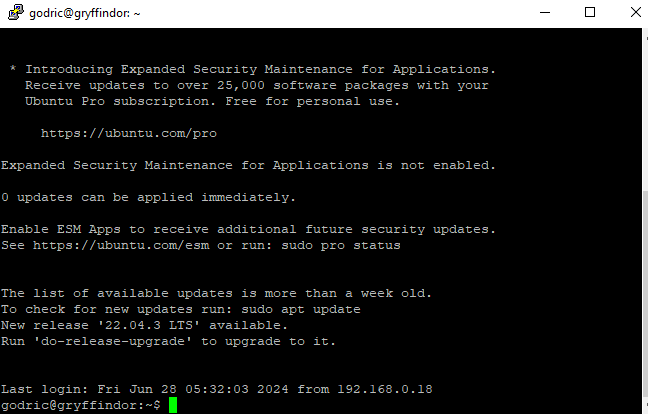
Figure 30. Successfuly server connection through PuTTY.
3. Windows Command Line Interface
Finally, if you prefer built-in powershell or cmd on Windows, you can use that too
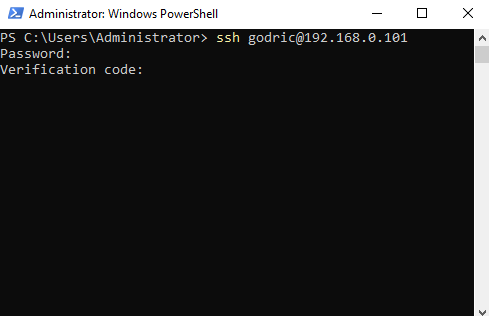
Figure 31. SSH through Windows Powershell.
Best Practices for Using SSH
-
Keep system software up to date
Always update your SSH client and server with the latest patches that fix security issues as they are found and resolved [NeBr12].
Distribution Command to update Fedora & RHEL sudo yum updateUbuntu sudo apt updateTable 4. Commands to update installed software packages on various Linux distributions.
-
Strong authentication
Implement Multi-factor Authentication (MFA) to ensure extra layer of security. -
Public key authentication
Prefer public key authentication over password-based authentication. -
Hardened configuration
To reduce the attack surface, disable unnecessary SSH services and protocols [Tiwa00].
Conclusion
In conclusion, the Secure Shell (SSH) protocol is an important tool for secure remote access and management of Unix-like systems, that uses well-known encryption algorithms for confidentiality, integrity, and authentication. The use of OpenSSH commands such as ssh and scp demonstrates its practical applications, ranging from simple remote logins to secure file transfers. Additionally, we explored the functionalities of the SSH client and server, along with 2FA setup on the Linux server. And concluded this article with best practices for using SSH.
If you have any questions or suggestions, please don't hesitate to contact me at hello[at]amaharjan.de.
Articles recommended by the author
References
[Barr16] D. J. Barrett, Linux Pocket Guide. O’Reilly, 2016. [Online]. Available: https://books.google.de/books?id=S3tfAQAACAAJ
[BaSi01] D. J. Barrett and R. E. Silverman, SSH, the Secure Shell: The Definitive Guide. O’Reilly, 2001. [Online]. Available: https://books.google.de/books?id=JFa5aLIII6oC
[LoYl06] C. M. Lonvick and T. Ylonen, “The Secure Shell (SSH) Protocol Architecture,” Internet Engineering Task Force, Request for Comments RFC 4251, Jan. 2006. doi: 10.17487/RFC4251. Available: https://doi.org/10.17487/RFC4251
[Mcdo20] M. McDonald, Web Security for Developers: Real Threats, Practical Defense. No Starch Press, 2020. [Online]. Available: https://books.google.de/books?id=ACVaxQEACAAJ
[NeBr12] C. Negus and C. Bresnahan, Linux Bible. Wiley, 2012. [Online]. Available: https://books.google.de/books?id=pdgJ3HIgSHEC
[Neme11] E. Nemeth, UNIX and Linux System Administration Handbook. Prentice Hall, 2011. [Online]. Available: https://books.google.de/books?id=0SIdBAAAQBAJ
[Occu18] OccupyTheWeb, Linux Basics for Hackers: Getting Started with Networking, Scripting, and Security in Kali. No Starch Press, 2018. [Online]. Available: https://books.google.de/books?id=P1v6DwAAQBAJ
[Ward14] B. Ward, How Linux Works, 2nd Edition: What Every Superuser Should Know. No Starch Press, 2014. [Online]. Available: https://books.google.de/books?id=fP5WBQAAQBAJ
[Tiwa00] H. Tiwari, “Enhancing SSH Security: Strategies and Best Practices Against Cyber Attacks”, [Online]. Available: https://insights2techinfo.com/wp-content/uploads/2023/11/CSIM_Enhancing-SSH-Security-Strategies-and-Best-Practices-Against-Cyber-Attacks-1-4.pdf
Icons from https://icons8.com/icons