Set a Static IP Address on Linux
In this post, I’ll walk you through how to assign a static IP on Linux; for Ubuntu (using Netplan) and RHEL/CentOS via network scripts.
1. Ubuntu
Ubuntu uses Netplan to manage network settings.
First, find out network interface name. Open your terminal and run:
ip addrLook for your active interface — something like enp0s3, eth0, etc. And IPv4 gateway. In my case enp0s3 and 192.168.1.1 respectively.
Now, edit the Netplan configuration
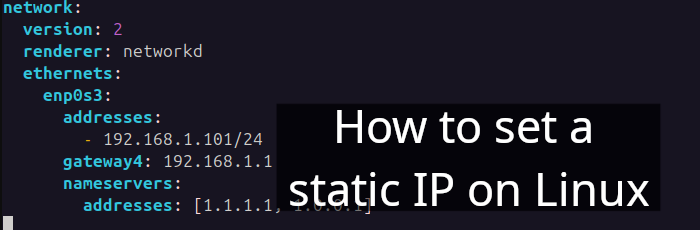
$ sudo vi /etc/netplan/00-installer-config.yamlPaste the following:
network:
  version: 2
  renderer: networkd
  ethernets:
    enp0s3:
      addresses:
        - 192.168.1.xxx/24
      gateway4: 192.168.1.1
      nameservers:
addresses: [1.1.1.1, 1.0.0.1]- Sets a static IP address of 192.168.1.xxx with a subnet mask of 255.255.255.0 (/24).
- Sets the IPv4 gateway (i.e., the router or default route) to 192.168.1.1.
Apply and reboot:
$ sudo netplan apply
$ sudo reboot
After reboot, the Ubuntu node will have the static IP.
2. RHEL / CentOS: Set Static IP via Network Scripts
On RHEL systems, IPs are typically set in the ifcfg scripts.
Find the interface:
ip link showAgain, identify the interface name (e.g., enp0s3). And edit the configuration file
sudo vi /etc/sysconfig/network-scripts/ifcfg-enp0s3Make changes accordingly:
...
DEVICE=enp0s3
ONBOOT=yes
PREFIX=24
IPADDR=192.168.1.212
DNS1=8.8.8.8
NETWORKING=yes
HOSTNAME=rhel.priv
GATEWAY=192.168.1.1
....- Replace
IPADDRthe your desired value.
Restart NetworkManager and reboot:
sudo systemctl restart NetworkManager
sudo reboot
Final Thoughts
Setting static IPs gives you better control over your network and is especially useful when working with servers, VMs, or remote access.
This has come in handy countless times while working on my home lab. I hope it proves just as helpful for your setup too.
I hope you enjoyed the tutorial! If you have any feedback, suggestions for improvement, or would like to collaborate, feel free to reach out — you can email me at hello@amaharjan.de.